Introduction
Reconnaissance is the most important phase in every bug bounty session or pentest engagement. A good recon can make a difference between a successful and failed result. Reconnaissance can be categorized into two: active and passive. One of the methods used during active reconnaissance is port scanning. This method allows pentesters and bug hunters to determine which ports are open on the target hosts or networks, as well as identify the services running on these ports.
However, port scanning always comes with a trade-off between speed and accuracy. During pentest engagements, the tester’s time is limited; while in bug bounties, there is always a race on who can discover and submit the bug first. These reasons force us to prioritize speed over accuracy during port scanning. The drawback to this is the failure to be accurate. With the race against time, we are missing open ports that could lead to a successful pentest engagement or bug hunting.
This research aims to find the balance between speed and accuracy during an Internet-wide port scanning using open-source and well-known tools.
I created MassMap to automate port scanning of large target IP addresses and/or CIDR notations. This tool was based on the result of this research.
Port Scanning Overview
Port scanning is one of the most commonly used techniques when doing reconnaissance. This technique allows pentesters or bug hunters to identify open ports available on a host, as well as recognize the services running on these open ports.
Port scanners can be categorized on how they operate: connection-oriented (synchronous mode) and connectionless (asynchronous mode) scanners.
Connection-oriented (Synchronous Mode)
This type of scanner sends a request to the target port/s and wait for a response until the timeout period expires. The drawback with this type of scanner is its slow performance because the scanner will not proceed to the next target port or IP until the current connection has been closed.
The good thing about connection-oriented scanners is that they are more accurate because they can recognize dropped packets.
The most popular example of a connection-oriented scanner is Nmap.
Connectionless (Asynchronous Mode)
Connectionless scanners do not rely on the completion of the current port being probe to start the next one since they have separate transmit and receive threads. This allows them to do a high-speed scan. However, these scanners are less accurate since they cannot detect dropped packets.
Masscan and Zmap are two of the most popular connectionless scanners available.
Nmap vs Masscan
For this research, only Nmap and Masscan were included. While Zmap produces good results and a fast scanner, it can only scan one port at a time. Based on experience, Zmap scan is still slow even when multiple jobs are running at the same time.
In spite of the good performances, features, and results that Nmap and Masscan provide, they still have their own weaknesses. The table below shows the PROS and CONS of both tools.
Take note that this is a not detailed comparison between the two tools. Only those that are relevant to the research were listed.
| Nmap | Masscan | |
|---|---|---|
| PROS | - More accurate between the two (uses synchronous mode) - Has a lot of features - Accepts both domain names & IP addresses (both IPv4 & IPv6) | - Very fast (uses asynchronous mode)- Syntax is very similar to Nmap |
| CONS | - Very slow when scanning hundreds of thousands of targets | - Inaccurate results when scanning large port ranges with high rates [1] - Does not accept domain names as target input - Does not automatically adjust the transmission rate according to the environment |
Research Idea
Based on the advantages and disadvantages of the tools listed above, the following solutions and problems were identified in trying to find the balance between speed and accuracy.
Solutions
The following were formed based on the PROS of the tools:
- Combine Nmap’s accuracy and its features with Masscan’s speed.
- Use Masscan to do the initial port scan to identify open ports and hosts that have open ports.
- Use Masscan’s result (identified open ports and hosts) as input to Nmap for a detailed port scan.
Problems
While the ideas listed above are great, we still need to solve the CONS of each tool. Specifically, we need to solve:
- Nmap’s slow performance when scanning hundreds of thousands of targets.
- Masscan’s inaccuracy when scanning large port ranges with high rates [2].
Research Setup
Target Networks
The following subnets were chosen as the target networks for this research:
| Targets | Subnets |
|---|---|
| A | A.A.0.0/16 |
| B | B.B.0.0/16 |
| C | C.C.0.0/16 |
| D | D.D.0.0/16 |
Scanning Machine
Only one scanning machine was used during the research due to limited budget. The scanning machine used was a $20 VPS from DigitalOcean with 4GB RAM, 2 vCPUs, and 4TB of monthly bandwidth. Throughout the entire research, this machine only used 1 IP address located at a fixed location.
Test Cases
For this research, both tools have their own test cases which are variations of the different options available in each tool. These test cases aim to solve the CONS of the tools and take advantage of their PROS to find the balance between speed and accuracy.
Masscan:
- Regular scan of all TCP ports with varying rates.
- Split the
/16target subnet into chunks of/20, and run X concurrent Masscan jobs, each with Y rate. - Split
1-65535port range into several ranges, and run X concurrent Masscan jobs, each with Y rate.
Nmap:
- Regular scan of all TCP ports.
- Scan of all TCP ports using X concurrent jobs.
- Scan on the combined list of open ports and hosts identified by Masscan.
- Scan on the specific open ports on specific hosts identified by Masscan.
It’s impossible to cover every variations/combinations of options in a limited period of time, thus only the above were covered.
For test cases which use concurrent jobs, GNU Parallel was used. If you’re new to this tool, please check this detailed tutorial.
Scope and Limitations
- The research was conducted using the following versions of the tools:
Nmap v7.70andMasscan v1.0.5-51-g6c15edc. - This research only covered IPv4 addresses.
- Scanning of UDP ports was not included.
- Only the most popular and open source tools were used. (Zmap was not included since it can only scan one port at a time; resulting in a very slow scan even when multiple jobs are being run.)
- Only 4 target networks were probed and they were all
/16. - Port scanning came from only one machine with one IP address located in a fixed location.
- Masscan rate was limited to 250kpps (packets per second) only since the scanning machine does not support PF_RING.
- Not all combinations of test cases were conducted due to limited resources (doing so is very time consuming).
Masscan Test Cases & Results
This section details the different test cases performed with Masscan and their results.
Test Case #1: Regular scan of all TCP ports with varying rates
There’s nothing special with this test case. This is just a normal scan using Masscan but with varying rates.
The following command was used to initiate the scan for this test case:
masscan -p 1-65535 --rate RATE--wait 0 --open TARGET_SUBNET -oG TARGET_SUBNET.gnmap
Rates Used:
- 1M
- 100K
- 50K
During the experiment, the maximum rate that my VPS can run is only around 250kpps. This is because the scanning machine does not support PF_RING. 
Charts: 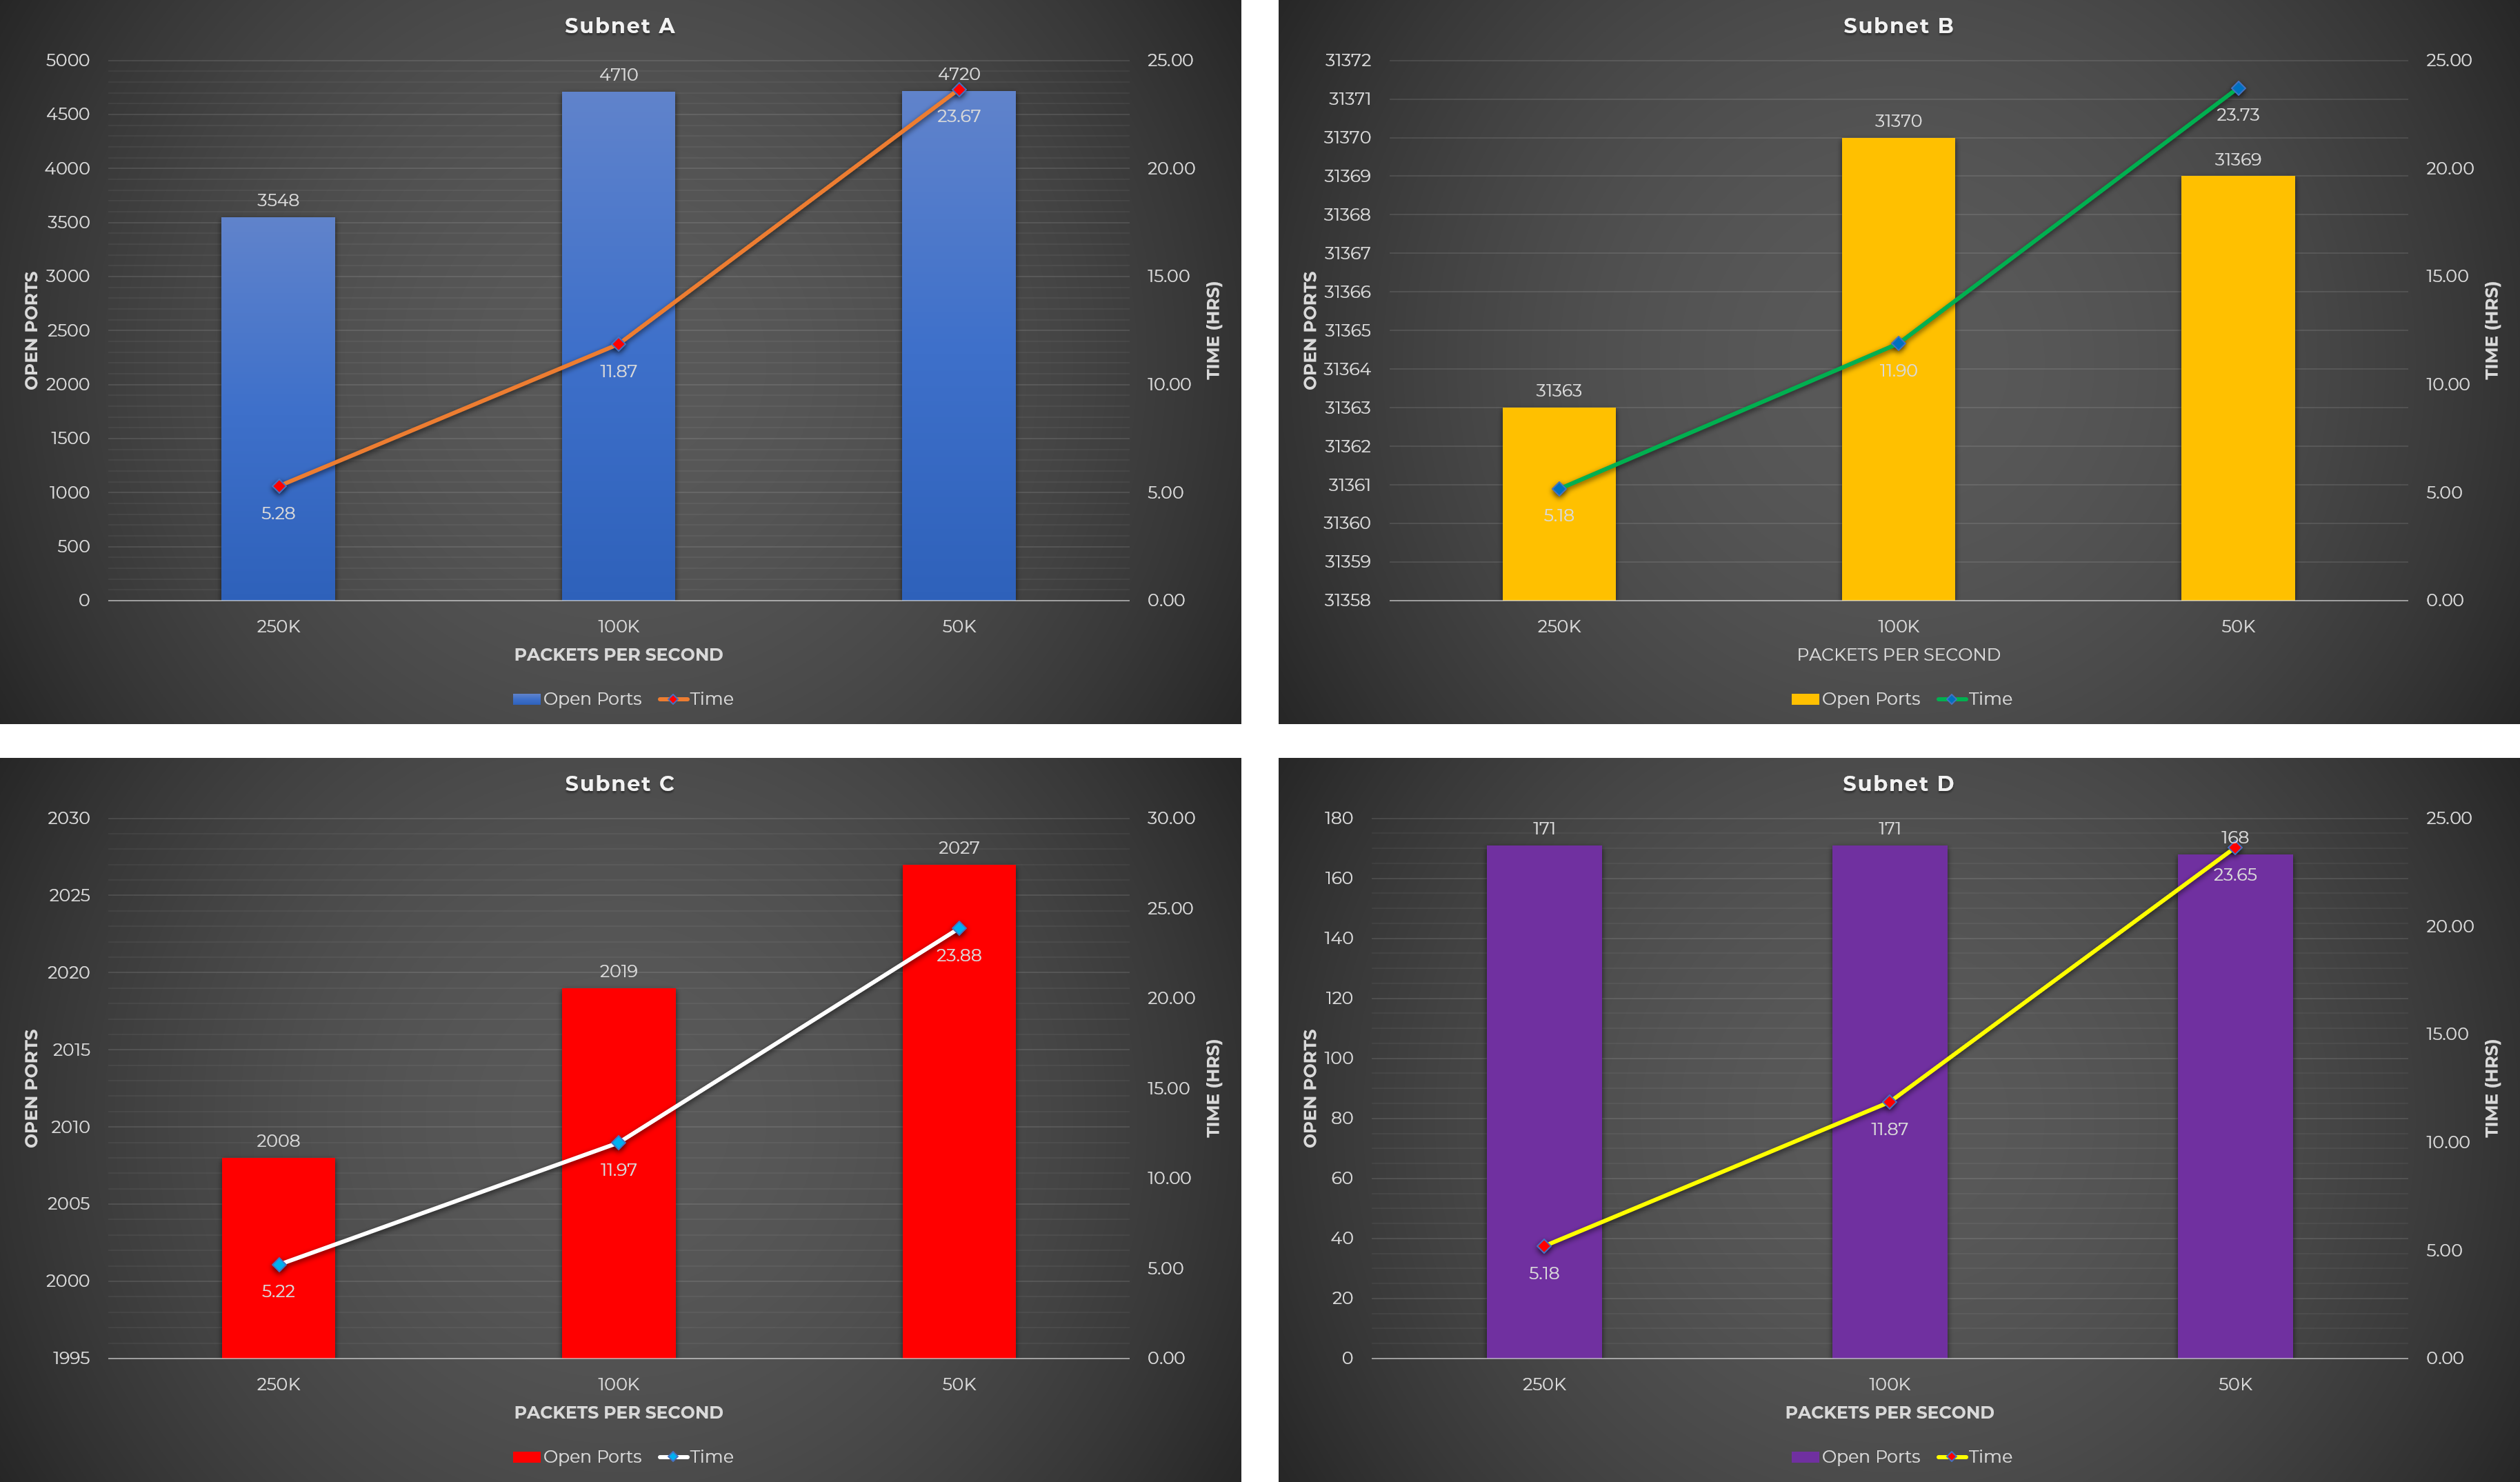
Observation:
- Slower rate results into more open ports, but at the expense of a longer scanning time.
Test Case #2: Split the /16 target subnet into chunks of /20, and run X concurrent Masscan jobs, each with Y rate
To be able to run concurrent jobs, I decided to split the /16 target subnet into smaller subnets. You can split them into other smaller subnets such as /24, but for this research I used /20.
To split the target network into smaller subnets, the following python code was utilized:
#!/usr/bin/python3
import ipaddress, sys

target = sys.argv[1]
prefix = int(sys.argv[2])

for subnet in ipaddress.ip_network(target).subnets(new_prefix=prefix):
    print(subnet)
Here’s a snippet of what the above code does: 
The rates used for each job were based on the idea of maximizing the rate that the scanning machine can handle. In my case, my scanning machine can only handle 250kpps so if I’m going to run 5 parallel jobs, each job can use a rate of 50kpps.
Since the maximum rate of a machine is not “absolute” (not exactly 250kpps in this case), you can set the rate of each job so the total rate would be equal to 80-90% of the maximum rate.
For this test case, the below command was executed. The smaller subnets outputted by split.py were used by parallel as inputs to run concurrent jobs.
python3 split.py TARGET_SUBNET 20 | parallel -j JOBS "masscan -p 1-65535 --rate RATE--wait 0 --open {} -oG {//}.gnmap"
Here’s what the above command does when executed. In this instance, 20 Masscan jobs, each with 10kpps rate, were running at the same time. 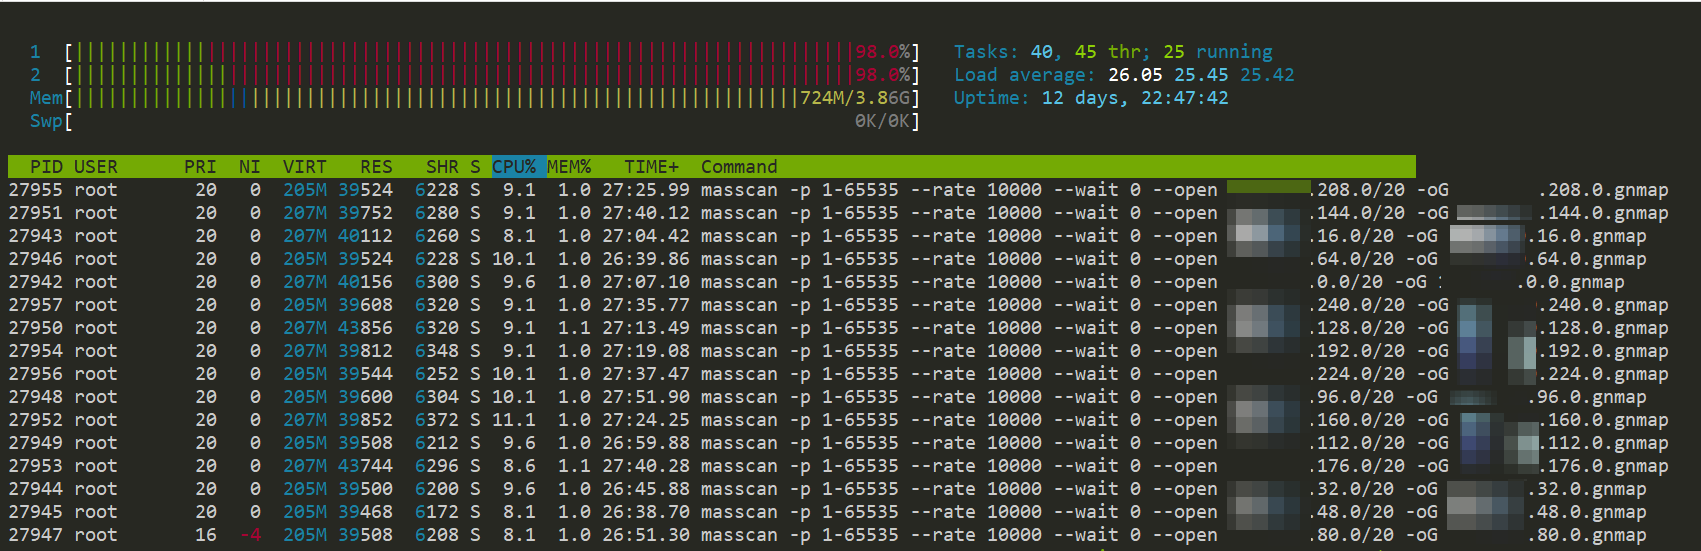
Rates and Jobs Used:
- 5 jobs each w/ 100k rate
- 5 jobs each w/ 50k rate
- 20 jobs each w/ 10k rate
Notes:
- I miscalculated the rate for the first rate & job variation (5 jobs each w/ 100k rate) since its total rate is 500kpps while my machine can only handle 250kpps. Nonetheless, the result is still valuable as you will see in the charts below.
- Other combinations such as 10 jobs each w/ 20k rate is doable, however I can’t cover all possible combinations due to limited time and budget.
Charts: 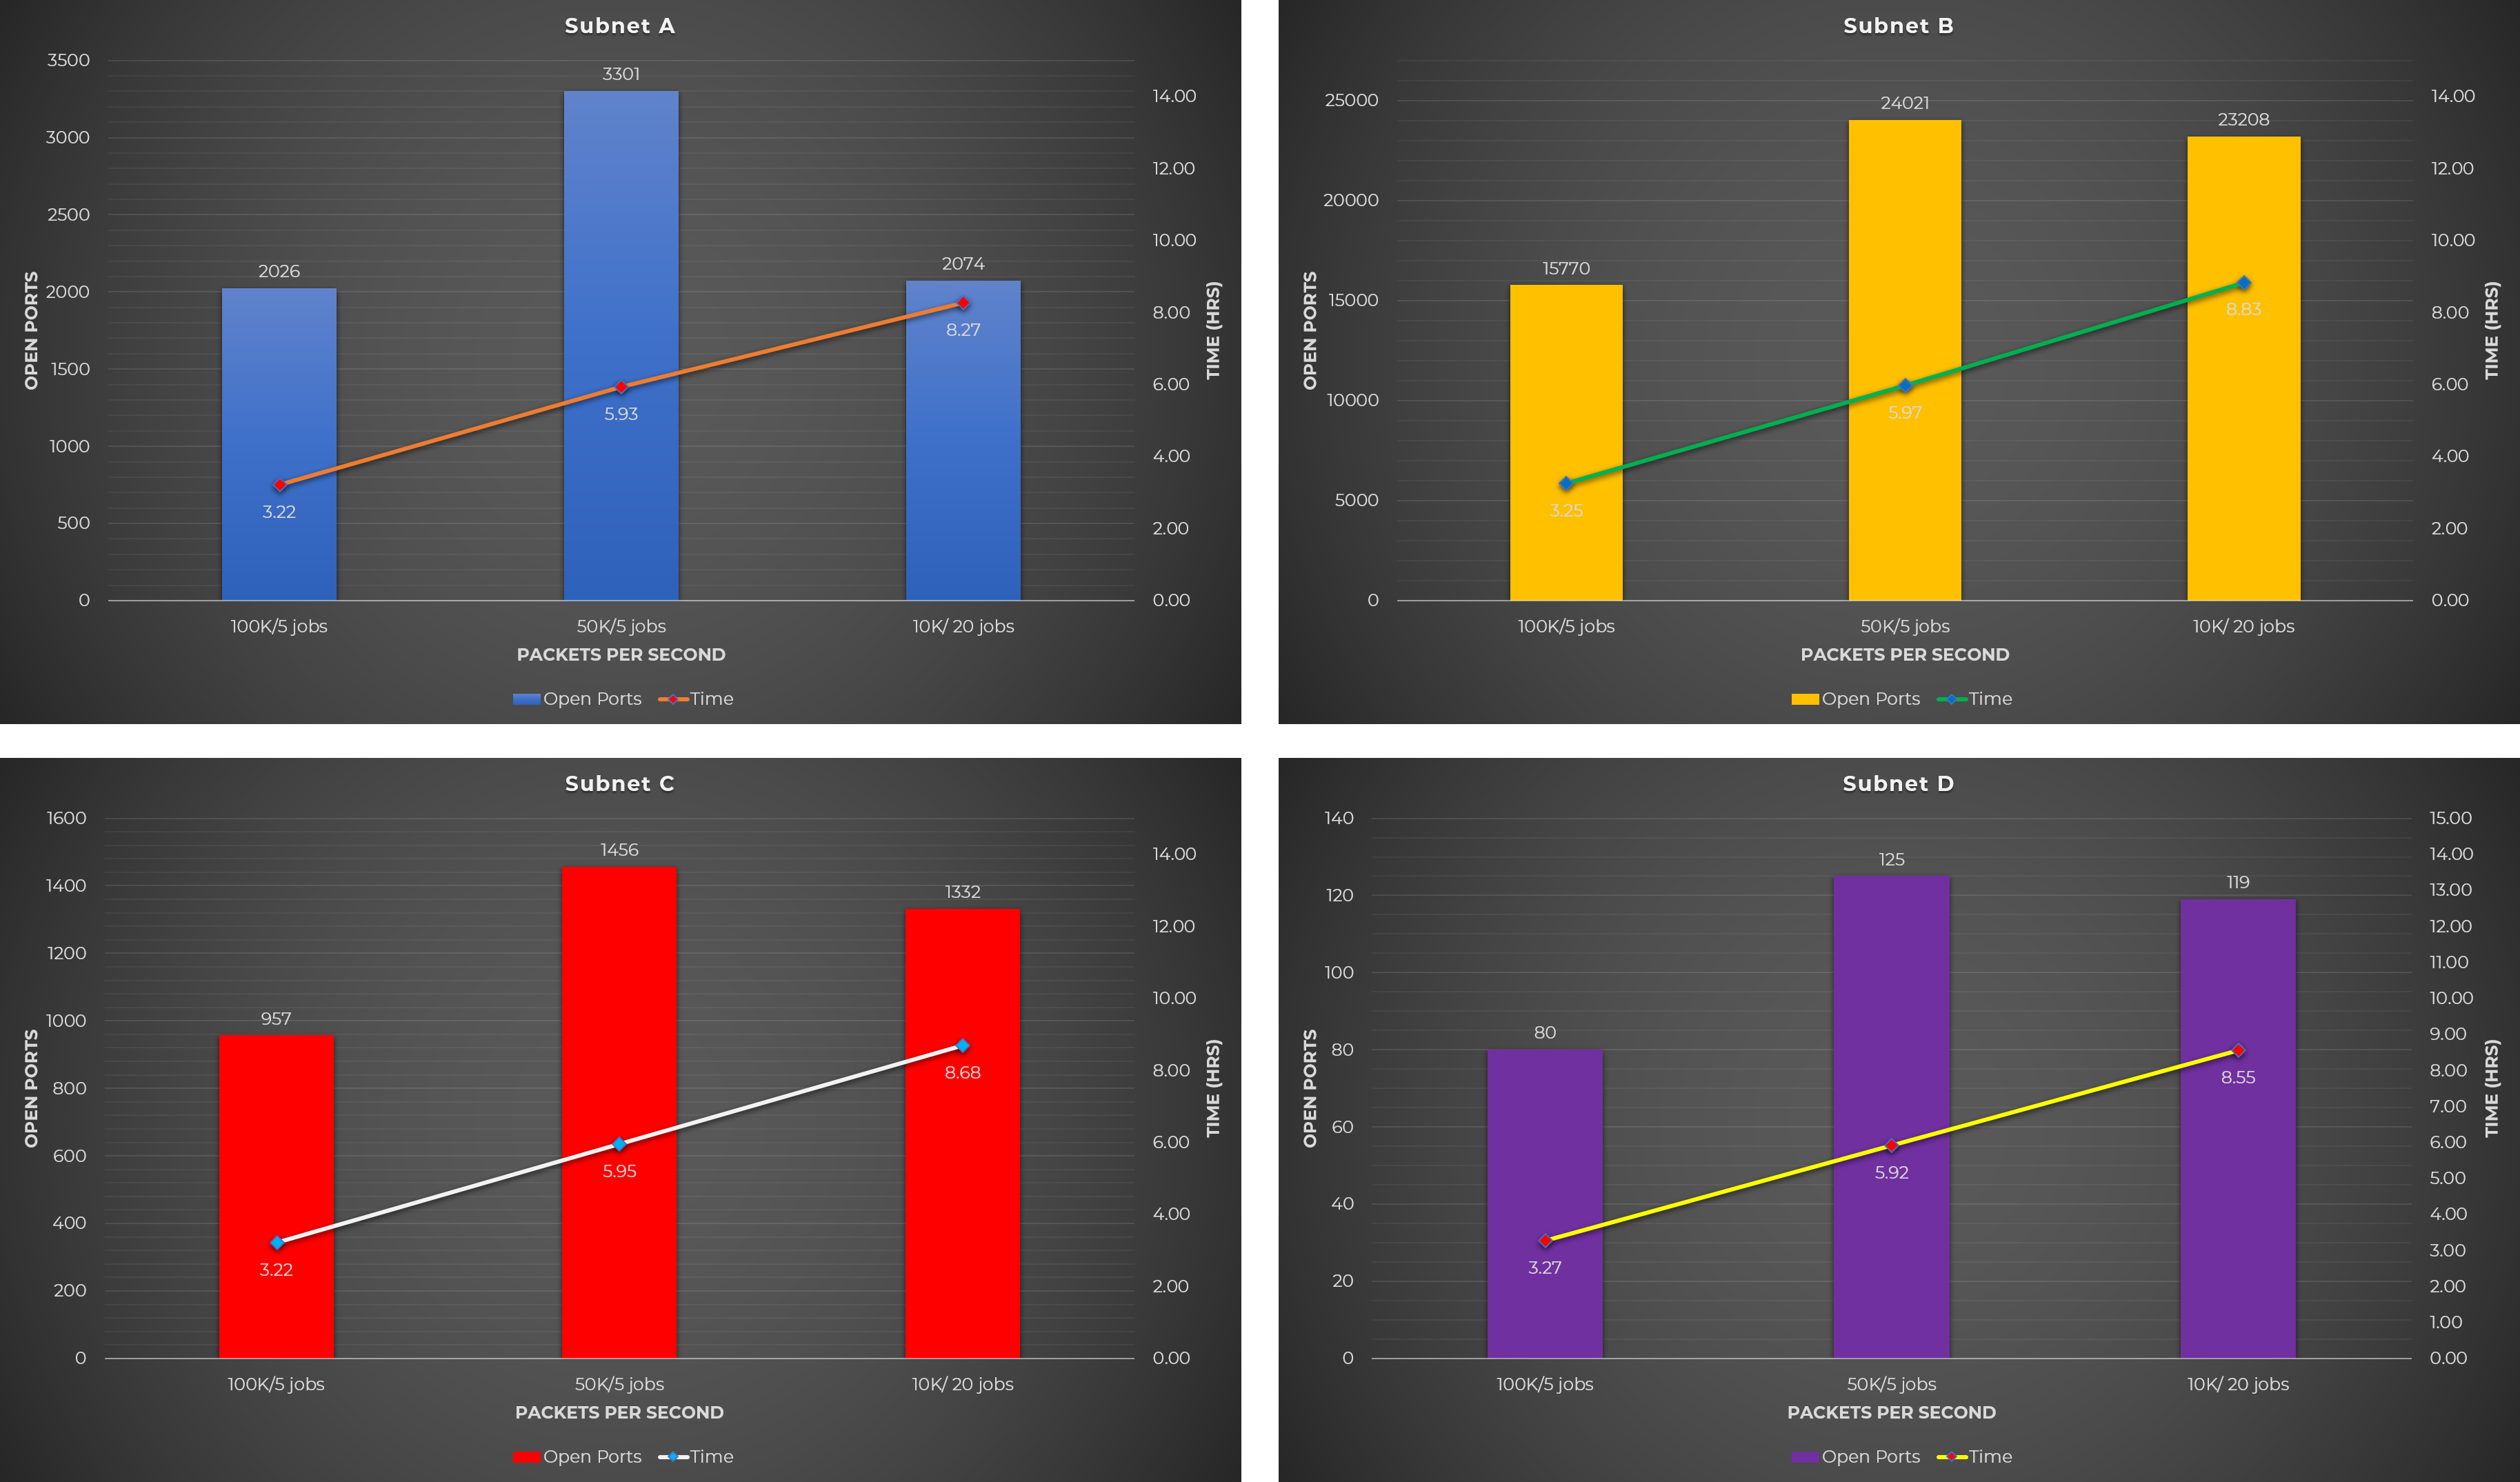
Observations:
- Running concurrents jobs took 2-3 times faster than the regular scan (Test Case #1), but results into fewer open ports.
- Using the scanning machine’s maximum rate capacity results into fewer open ports (5 jobs each w/ 100k rate).
- Fewer jobs with high rate (5 jobs each w/ 50k rate) is better than more jobs with low rate (20 jobs each w/ 10k rate).
Test Case #3: Split 1-65535 port range into several ranges, and run X concurrent Masscan jobs, each with Y rate
The 3rd test case tries to solve Masscan’s issue when scanning large port ranges, especially the entire 1-65535 port range. The solution that I came with is to split the 1-65535 range into smaller ranges.
Just like in the previous test case, the combination of jobs and rates used were based on the idea of using a total rate of 80-90% of the maximum capacity.
The command below was used to for this test case. The PORT_RANGES contains the list of port ranges and they are used as inputs to parallel for simultaneous tasks.
cat PORT_RANGES | parallel -j JOBS "masscan -p {} --rate RATE --wait 0 --open TARGET_SUBNET -oG {}.gnmap"
The 1-65535 port range was split into 4 ways as shown below and each split contains combinations/variations of jobs and rates.
Split #1: 5 Port Ranges
1-13107
13108-26214
26215-39321
39322-52428
52429-65535
Rates and Jobs Used:
- 5 jobs each w/ 50k rate
- 2 jobs each w/ 100k rate
Charts: 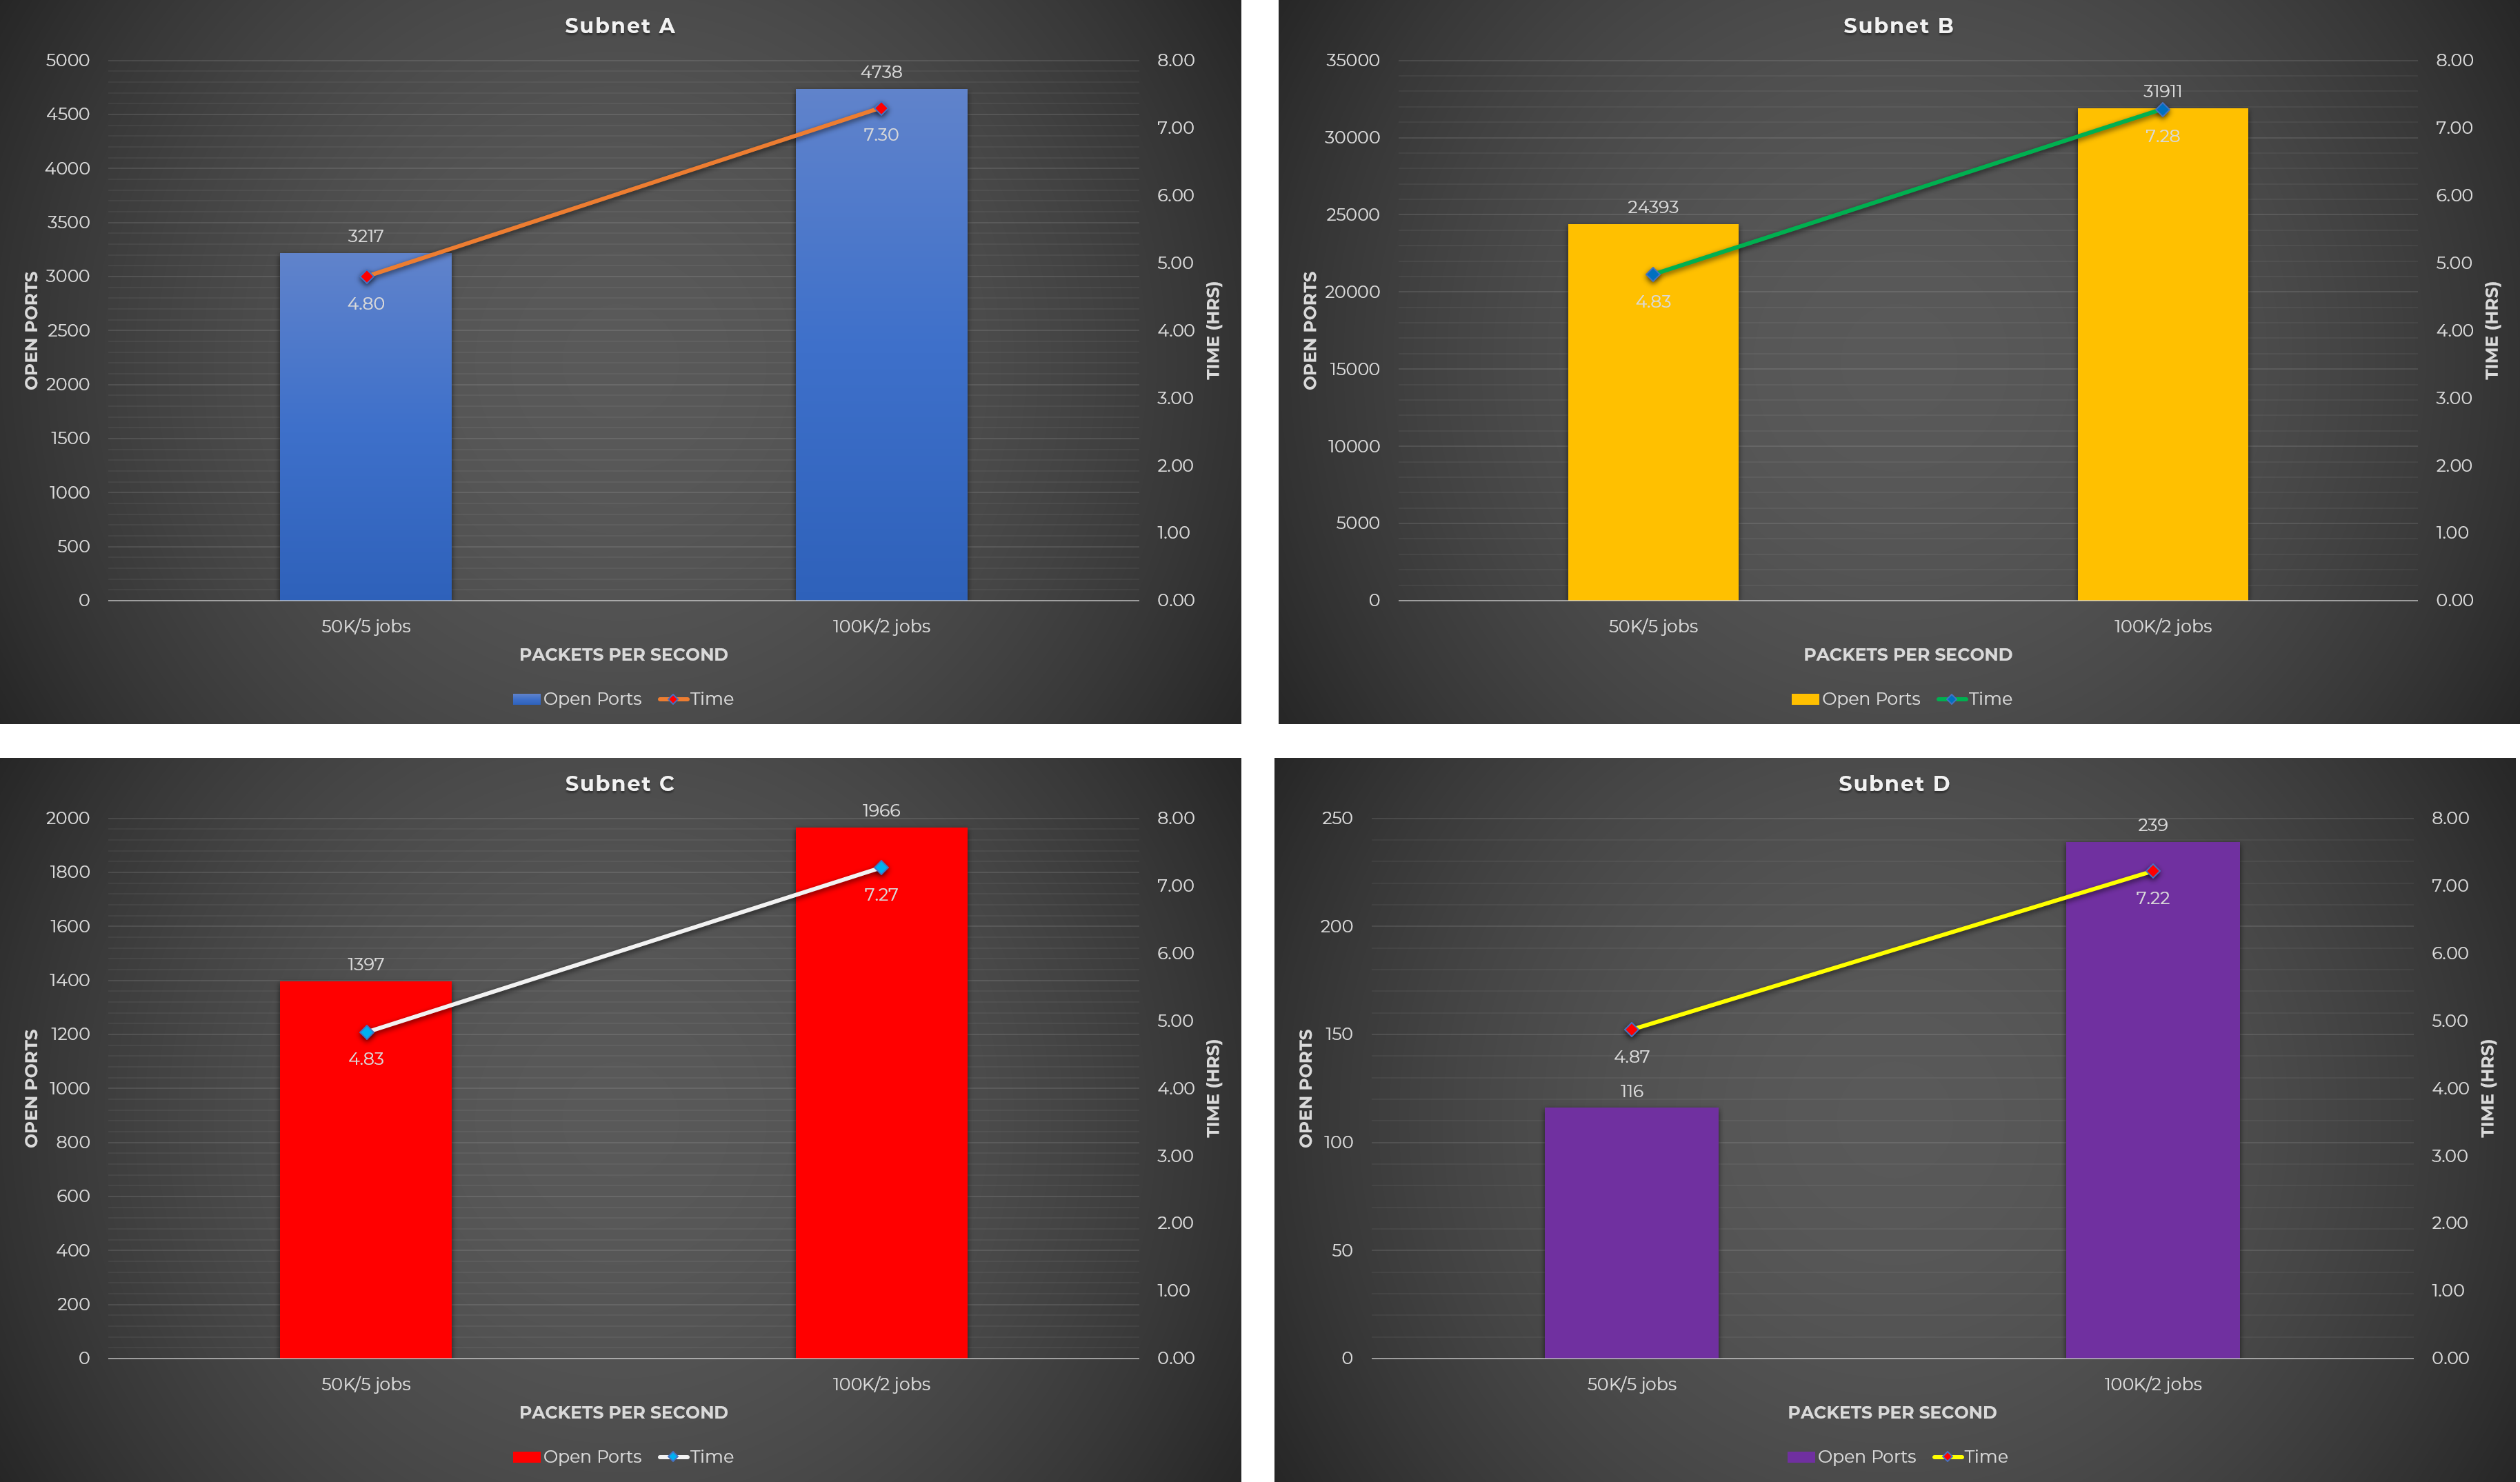
Split #2: 2 Port Ranges
1-32767
32768-65535
Rates and Jobs Used:
- 2 jobs each w/ 100k rate
- 2 jobs each w/ 125k rate
Charts: 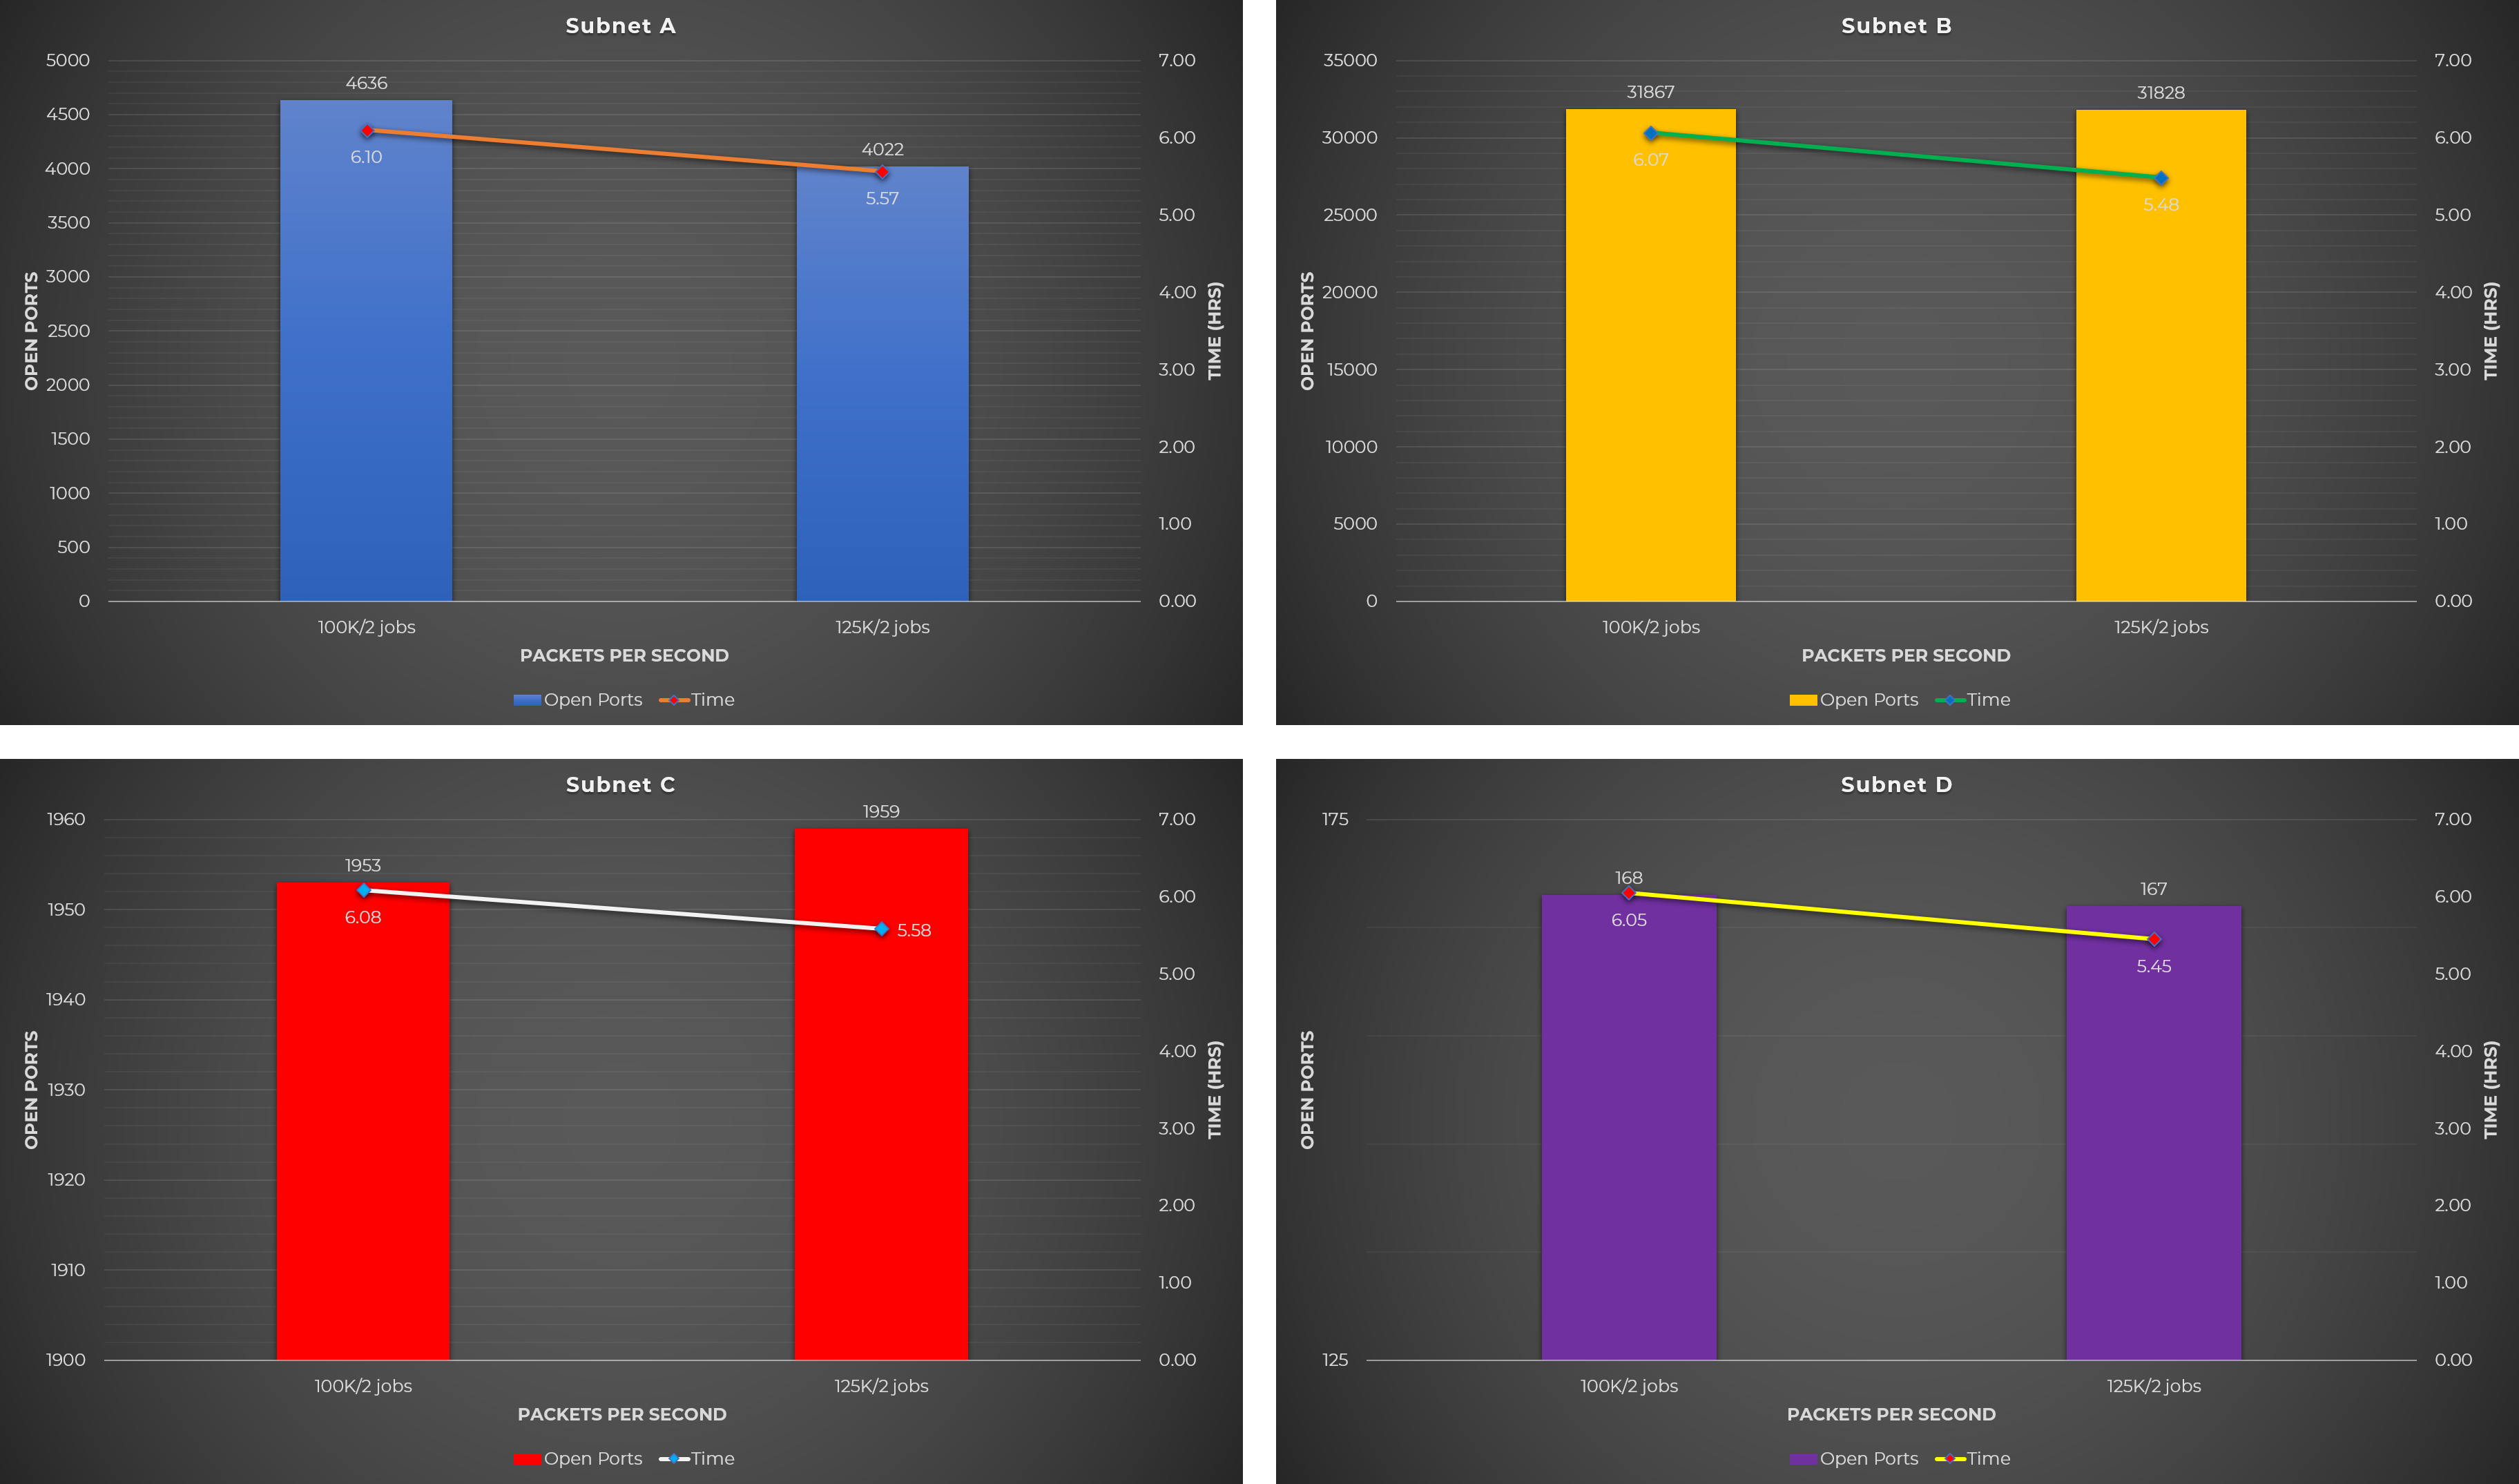
Split #3: 8 Port Ranges
1-8190
8191-16382
16383-24574
24575-32766
32767-40958
40959-49151
49152-57343
57344-65535
Rates and Jobs Used:
- 4 jobs each w/ 50k rate
- 2 jobs each w/ 100k rate
Charts: 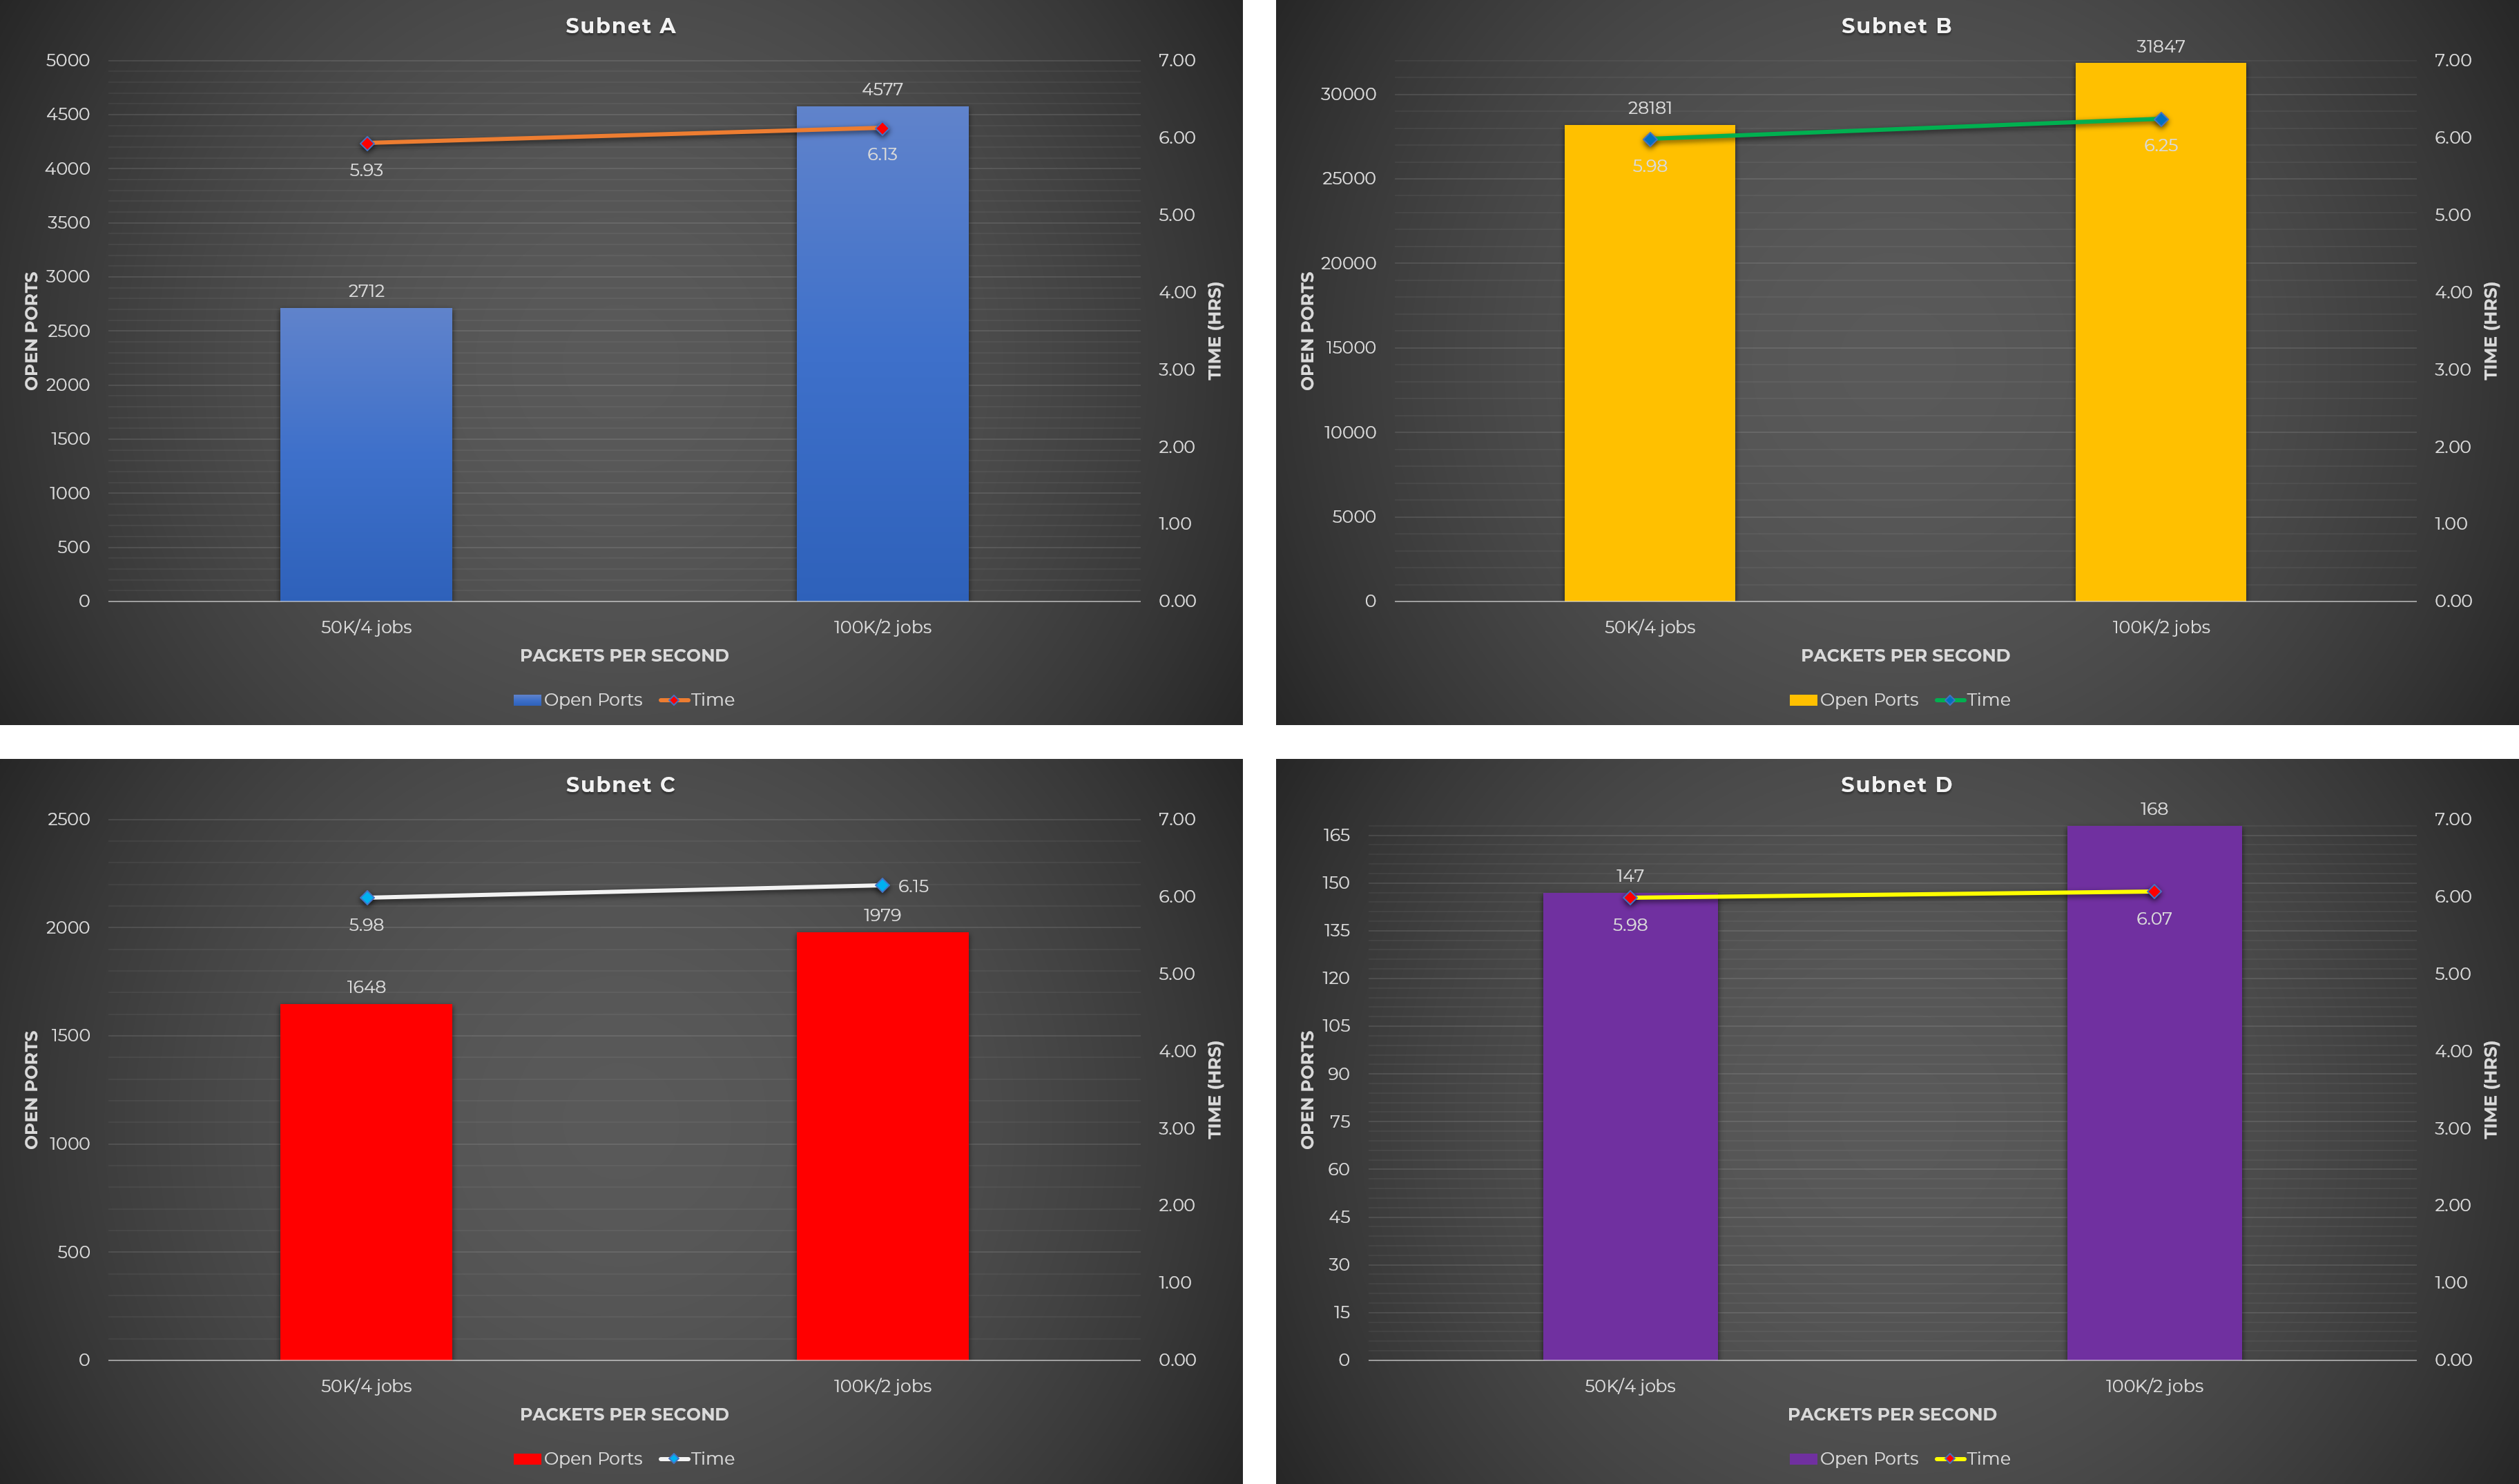
Split #4: 4 Port Ranges
1-16383
16384-32767
32768-49151
49152-65535
Rate and Job Used:
- 2 jobs each w/ 100k rate
The reason I only used one combination for the 4-port range split was because I realized that I already exceeded my monthly bandwidth limit. As a result, I had to pay $100+ more.
Charts: 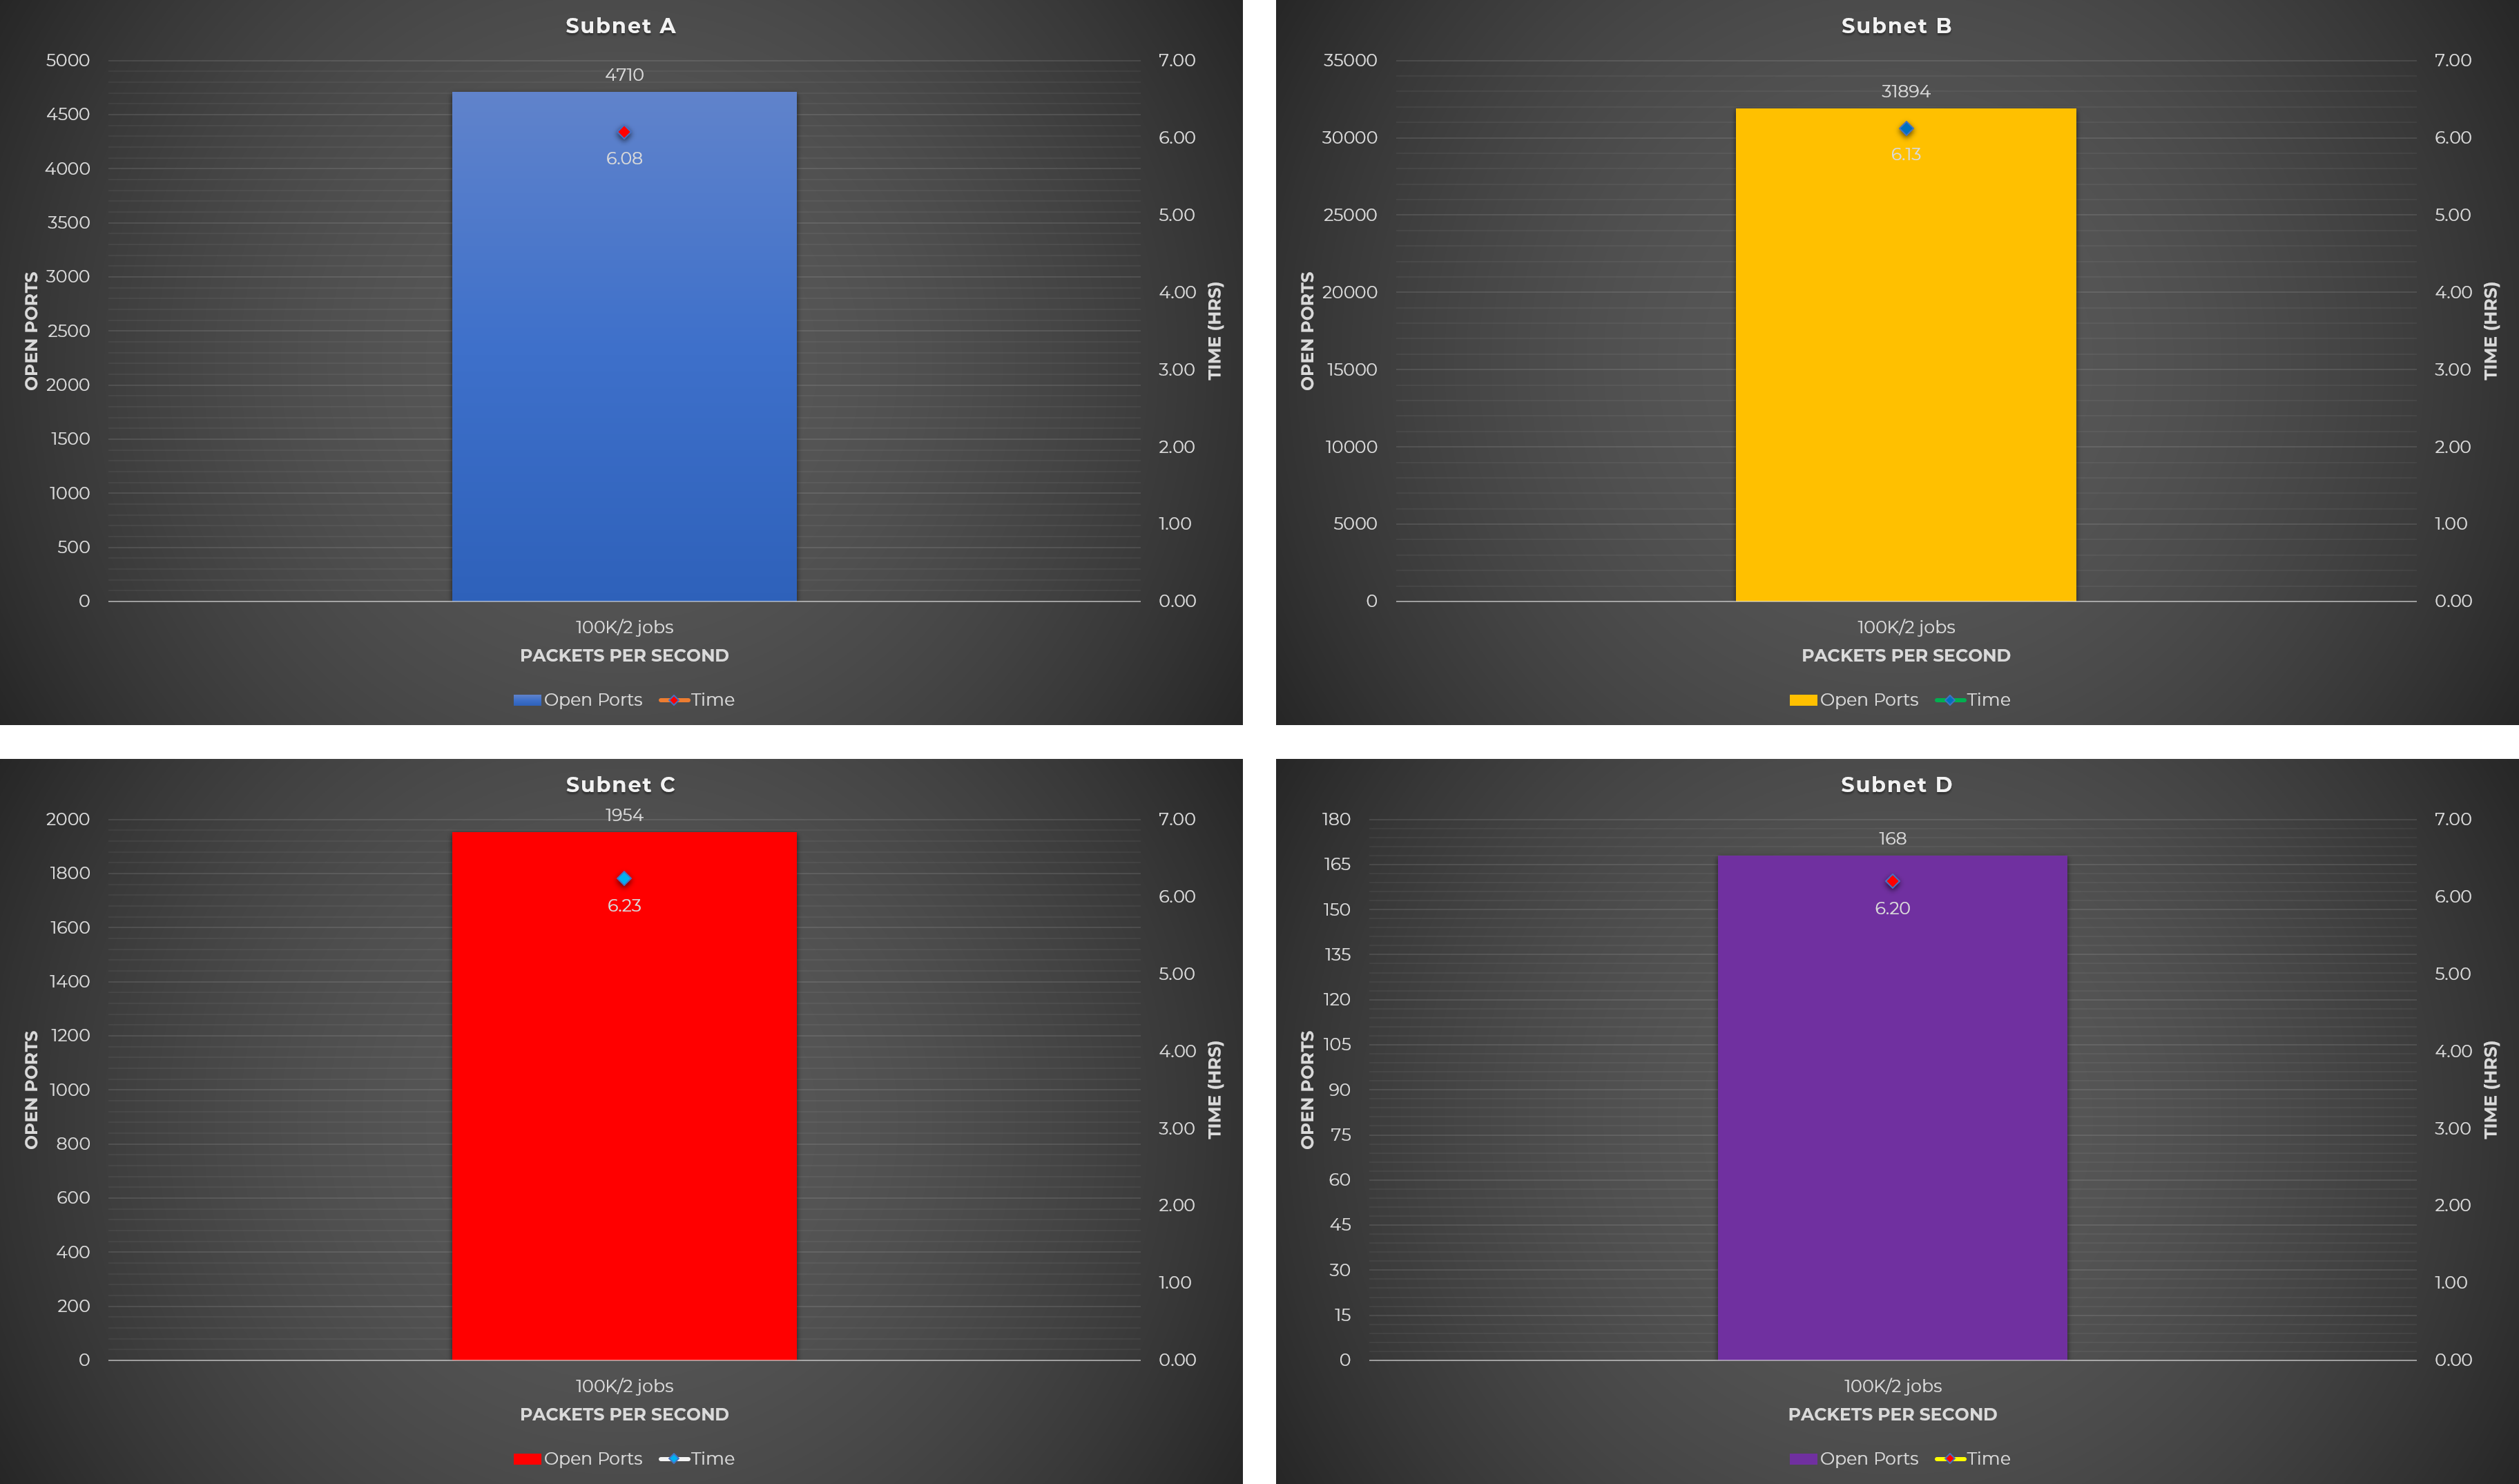
Observations:
The observations listed below cover all 4 splits mentioned above.
- Splitting port ranges result into more open ports (this solves Masscan’s issue when using large port ranges).
- Using fewer parallel jobs (2 jobs in this case) results into more open ports.
- Among the splits that were tested, the 5 port range split (Split #1) yields the best result.
Raw Data
The following table shows the raw data from the experiments performed using the different Masscan test cases mentioned above. 
Masscan Conclusion
Based on the results from the test cases performed with Masscan, the following were concluded:
- Running the scanning machine at 100% CPU utilization results into less open ports.
- Using the machine’s maximum rate capacity results into less open ports.
- When using parallel tasks, fewer jobs results into more open ports.
- Splitting port ranges is better than splitting the target subnet.
- A port range split of 4 to 5 yields (Split #1 and #4) the best results.
Nmap Test Cases & Results
In this phase, only version scanning was performed and the use of Nmap’s NSEs, OS guess, and other scanning features were not included. Nmap threads were also limited to T4 which does the equivalent of:
--max-rtt-timeout=1250ms --min-rtt-timeout=100ms --initial-rtt-timeout=500ms --max-retries=6 --max-scan-delay=10ms
The following Nmap options were also used to mimic the options used by Masscan. These options were applied to all Nmap test cases.
Options Used:
- SYN scan (
-sS) - Version scan (
-sV) - Threads (
-T4) - Randomize target hosts order (
--randomize-hosts) - No ping (
-Pn) - No DNS resolution (
-n)
Test Case #1: Regular scan of all TCP ports
This test case is just a normal scan using Nmap so there’s nothing special in it.
The command used for this test case was:
sudo nmap -sSV -p- -v --open -Pn -n --randomize-hosts -T4 TARGET_SUBNET -oA OUTPUT
Observations:
- After 4.5 days of scanning, the job is still not finish. This is one of the CONS mentioned above; Nmap is very slow when scanning large target networks.
- I decided to cancel this test case due to very slow performance.
Test Case #2: Scan of all TCP ports using X concurrent jobs
In this case, I attempted to solve Nmap’s slow performance by running concurrent Nmap scans. This was done by splitting the target subnet into smaller chunks just like what I did with Masscan above. Again, the python code split.py below was used to split the target subnet.
#!/usr/bin/python3
import ipaddress, sys

target = sys.argv[1]
prefix = int(sys.argv[2])

for subnet in ipaddress.ip_network(target).subnets(new_prefix=prefix):
    print(subnet)
The following shows the command used for this test case:
python3 split.py TARGET_SUBNET 20 | parallel -j JOBS "sudo nmap -sSV -p- -v --open -Pn -n --randomize-hosts -T4 {} -oA {//}"
For this test case, I decided to run two instances of parallel jobs which can found below.
Using 5 Concurrent Jobs: /16 target subnet split into /20 subnets
Observation:
- Very slow as well. Scan is still not finish after 2.8 days so I canceled it.
Using 64 Concurrent Jobs: /16 target subnet split into /24 subnets
Observation:
- Five days have passed and the scan is still not finish so I canceled it too.
Test Case #3: Scan on the combined list of open ports and hosts identified by Masscan
The idea behind this test case is to first get a list of hosts and a combined list of open ports that were detected by Masscan. This combined list of open ports was used as the baseline (shown as green bar on the charts below) to determine whether the Nmap test cases below could detect more or less open ports.
For example, Masscan detected 300 open ports while regular Nmap scan detected 320 open ports. But when using 5 concurrent Nmap scans, only 295 open ports were detected. This means that the regular Nmap scan is the better option.
To get the list of hosts from Masscan’s output, the following command was used:
grep "Host:" MASSCAN_OUTPUT.gnmap | cut -d " " -f2 | sort -V | uniq > HOSTS
The following image shows the above command in action. 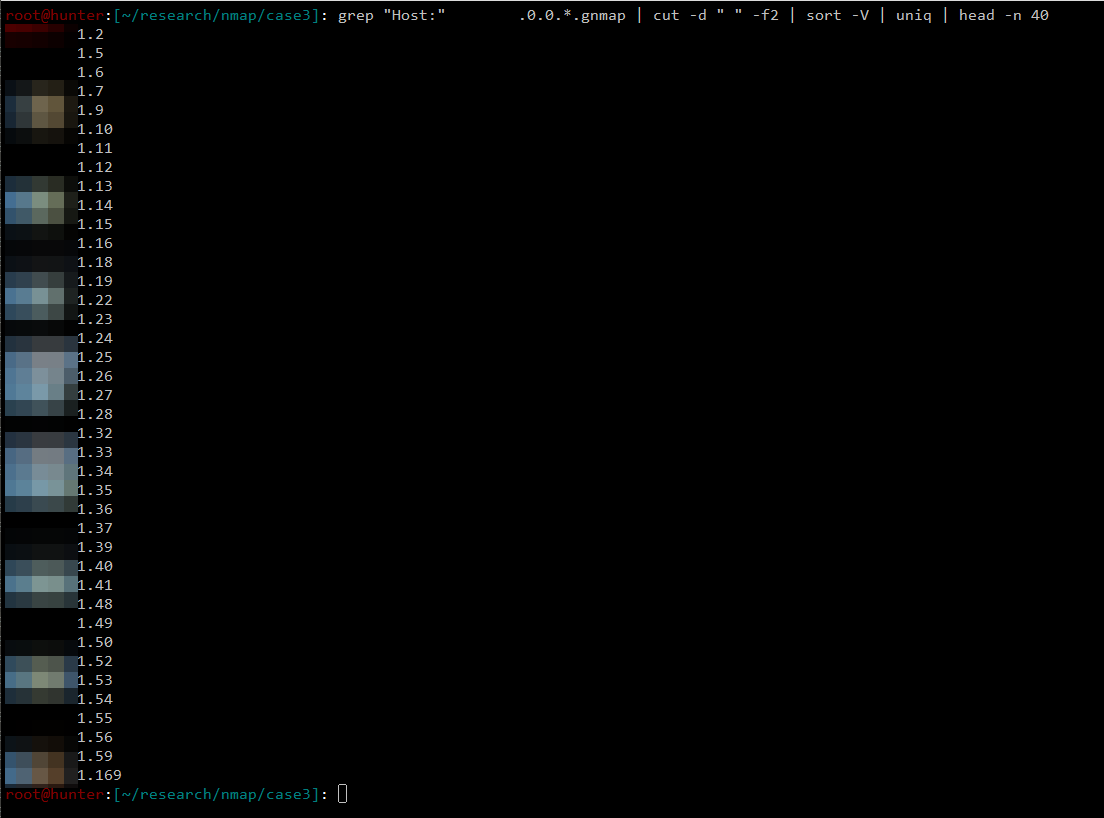
The command below was used to get the combined list of all open ports detected by Masscan.
grep "Ports:" MASSCAN_OUTPUT.gnmap | cut -d " " -f4 | cut -d "/" -f1 | sort -n | uniq | paste -sd, > OPEN_PORTS
The following shows the command in action. 
This command was used to run a regular Nmap scan.
sudo nmap -sSV -p OPEN_PORTS -v --open -Pn -n --randomize-hosts -T4 -iL HOSTS -oA OUTPUT
While the following was used to run concurrent Nmap scans. This uses the list of hosts and combined list of open ports produced by the commands above.
cat HOSTS | parallel -j JOBS "sudo nmap -sSV -p OPEN_PORTS -v --open -Pn -n --randomize-hosts -T4 {} -oA {}"
Jobs Used:
- 0 (this is a regular Nmap scan)
- 10
- 50
- 100
Charts: 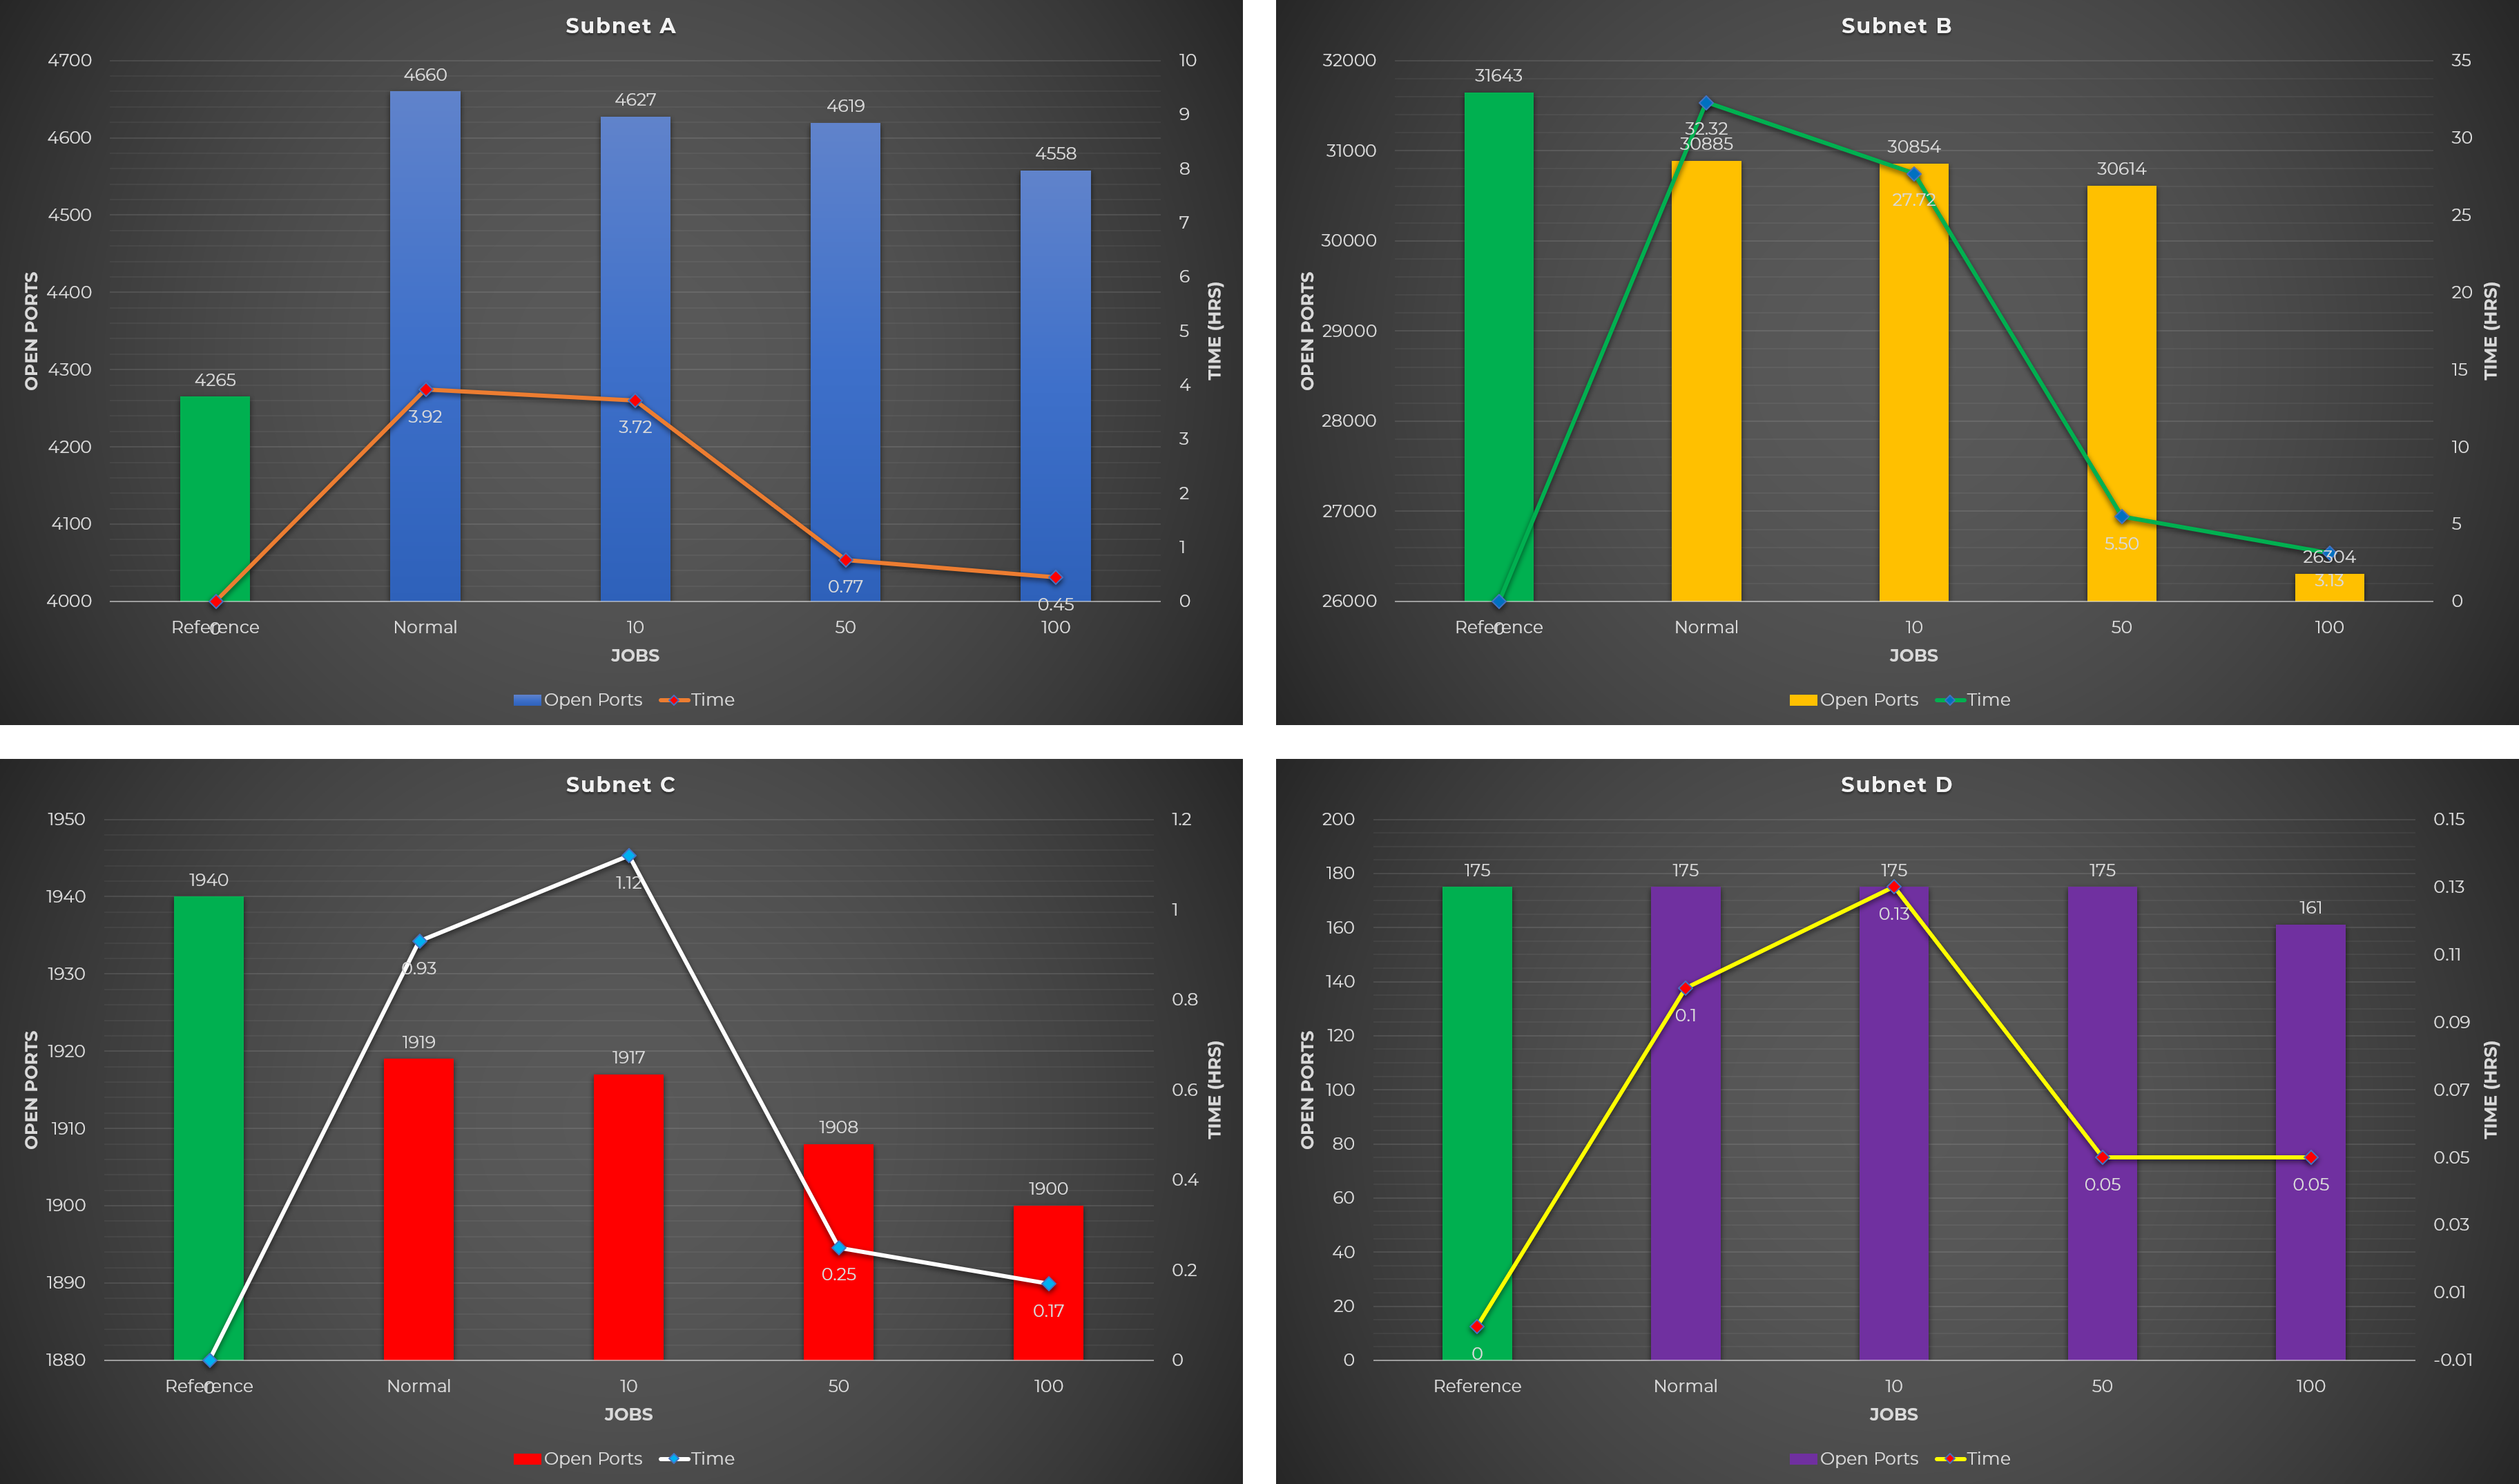
Observations:
- When running a regular Nmap scan, CPU utilization was around 10% only.
- A regular Nmap scan discovered more open ports, while concurrent Nmap scans discovered less open ports.
- Compared to the baseline (green bar on the chart), more open ports were identified on some target network (Subnet A), while less open ports were detected on others (Subnet B and C), and there’s not much difference on some network (Subnet D).
The Additional Open Ports Detected by Nmap
Take a look first at the table below. Let’s say for example that Masscan detected the following open ports (column 2) on each host. The combination of all open ports detected by Masscan will be used as the target ports when running an Nmap scan (column 3).
In our example, new open ports were detected (bold texts in column 4) by Nmap after finishing its scan. How did it happen? Masscan being an asynchronous scanner, it is possible that port 22 was missed on hosts 192.168.1.2 and 192.168.1.3. Since we combined all detected open ports on every hosts and used them as the target ports for Nmap, this missed port (22) will be probe again. The caveat is that there’s no assurance that Nmap will be able to detect it as open as there are other factors that might affect the scan.
| Hosts | Open Ports Detected by Masscan | Target Ports During Nmap Scan | Open Ports Detected After Running Nmap |
|---|---|---|---|
| 192.168.1.1 | 22,80,443 | 22,80,443,8080,8888 | 22,80,443 |
| 192.168.1.2 | 8080,8888 | 22,80,443,8080,8888 | 22,8080,888 |
| 192.168.1.3 | 80,443 | 22,80,443,8080,8888 | 22,80,443 |
Test Case #4: Scan on the specific open ports on specific hosts identified by Masscan
This one is somewhat similar from the previous test case. Here, I didn’t combine all the open ports detected by Masscan from each host. Whatever open ports were detected by Masscan on a particular host, the same ports will be used by Nmap. The following table illustrates what was done for this test case.
| Hosts | Open Ports Detected by Masscan | Target Ports During Nmap Scan |
|---|---|---|
| 192.168.1.1 | 22,80,443 | 22,80,443 |
| 192.168.1.2 | 8080,8888 | 8080,8888 |
| 192.168.1.3 | 80,443 | 80,443 |
The following command was used to get the list of hosts.
cat MASSCAN_OUTPUT.gnmap | grep Host | awk '{print $2,$5}' | sed 's@/.*@@' | sort -t' ' -n -k2 | awk -F' ' -v OFS=' ' '{x=$1;$1="";a[x]=a[x]","$0}END{for(x in a) print x,a[x]}' | sed 's/, /,/g' | sed 's/ ,/ /' | sort -V -k1 | cut -d " " -f1 > HOSTS
Image here shows what the command does. 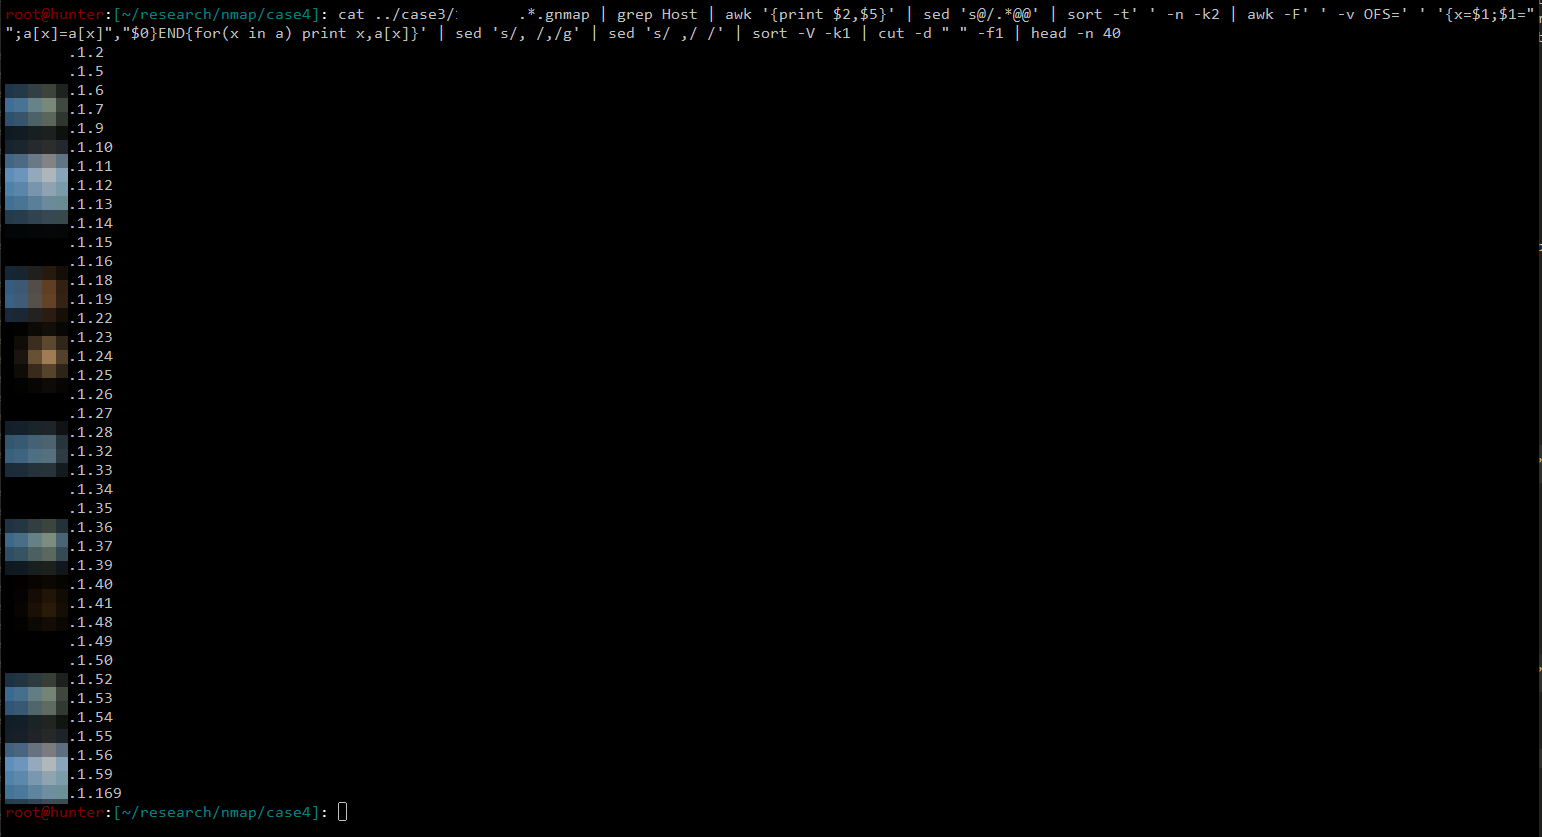
To get the list of open ports from each host, the following command was executed.
cat MASSCAN_OUTPUT.gnmap | grep Host | awk '{print $2,$5}' | sed 's@/.*@@' | sort -t' ' -n -k2 | awk -F' ' -v OFS=' ' '{x=$1;$1="";a[x]=a[x]","$0}END{for(x in a) print x,a[x]}' | sed 's/, /,/g' | sed 's/ ,/ /' | sort -V -k1 | cut -d " " -f2 > OPEN_PORTS
Here’s what the command does. 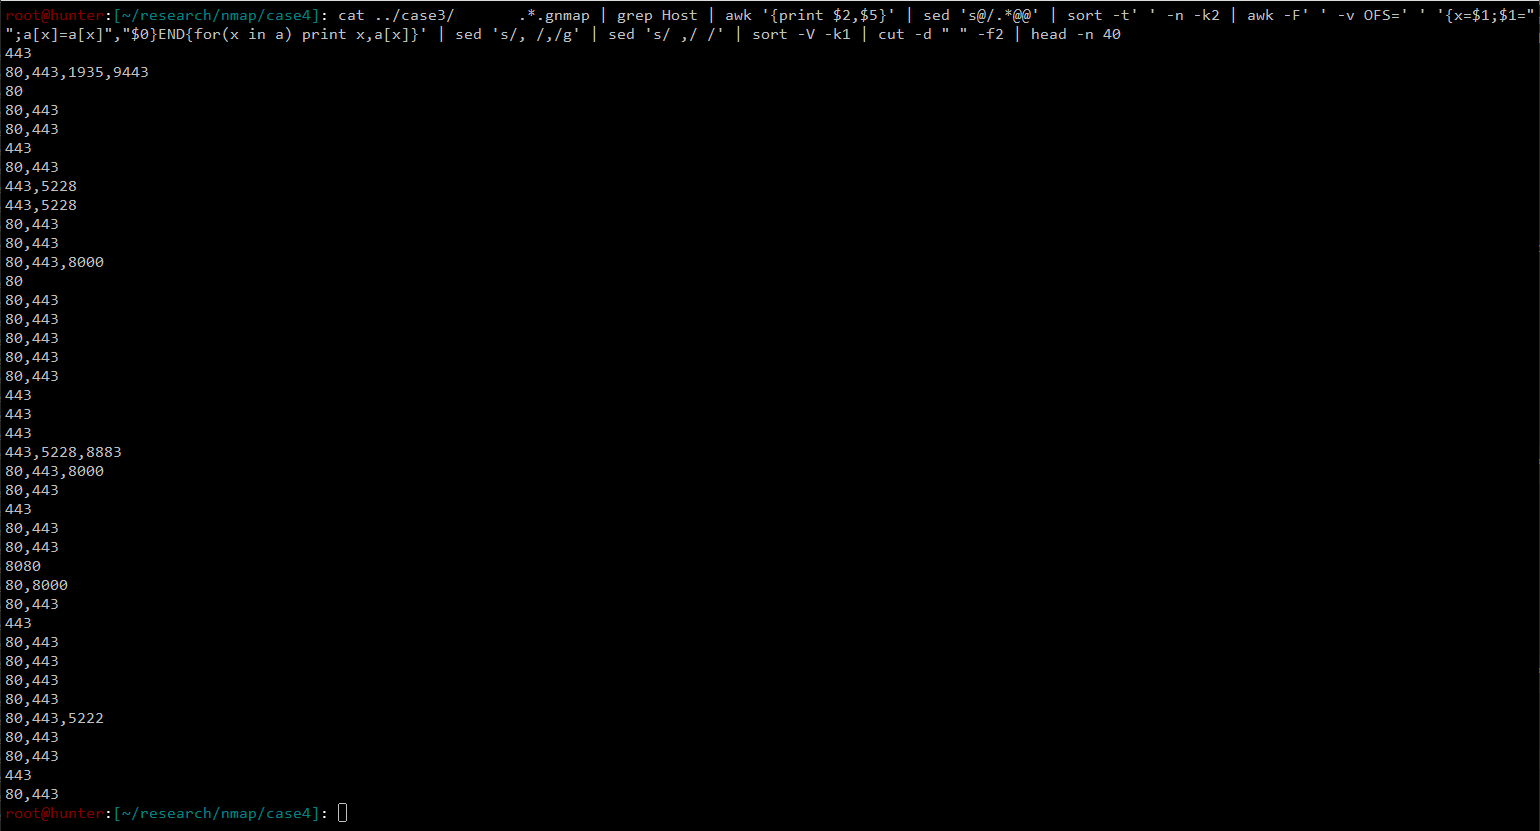
As you can see, the output is different from the command used in Test Case #3. Instead of combining all the open ports, we created a list of all open ports found from each host.
These two lists were then used as inputs to parallel, using the option ::::, to run simultaneous Nmap scans.
Again, if you’re not familiar with GNU Parallel, please take a look at this tutorial.
parallel -j JOBS --link "sudo nmap -sSV -p {2} -v --open -Pn -n -T4 {1} -oA {1}" :::: HOSTS :::: OPEN_PORTS
This is an example of what happens, based on the two images above, when the above parallel command was executed to initiate simultaneous scans.
sudo nmap -sSV -p 443 -v --open -Pn -n -T4 192.168.1.2 -oA 192.168.1.2
sudo nmap -sSV -p 80,443,1935,9443 -v --open -Pn -n -T4 192.168.1.5 -oA 192.168.1.5
sudo nmap -sSV -p 80 -v --open -Pn -n -T4 192.168.1.6 -oA 192.168.1.6
sudo nmap -sSV -p 80,443 -v --open -Pn -n -T4 192.168.1.7 -oA 192.168.1.7
sudo nmap -sSV -p 08,443 -v --open -Pn -n -T4 192.168.1.9 -oA 192.168.1.9
The following image shows a snippet of what happened when the test case was executed. As seen below, 10 concurrent Nmap scans are running using parallel. 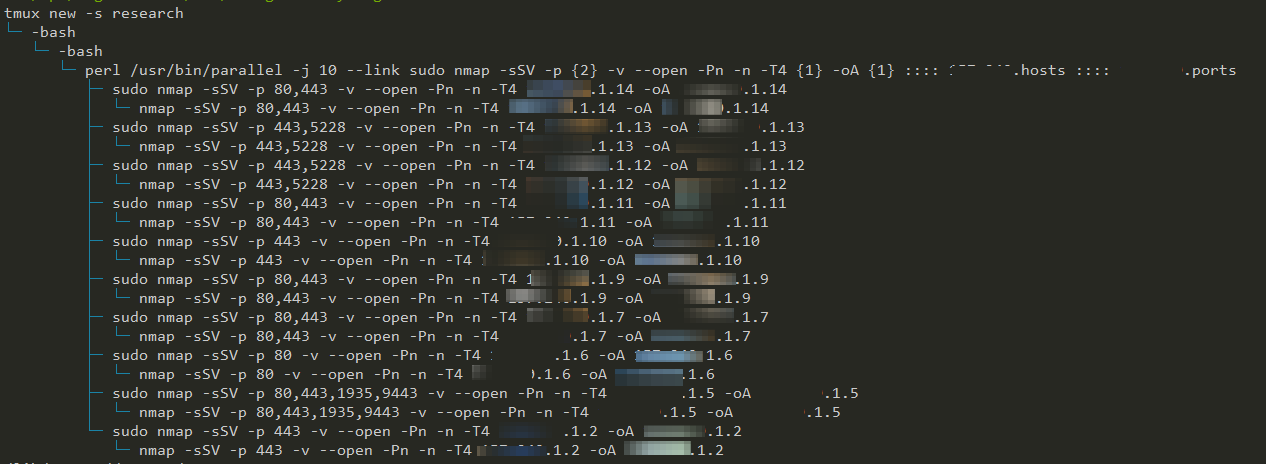
Jobs Used:
- 10
- 50
- 100
Charts: 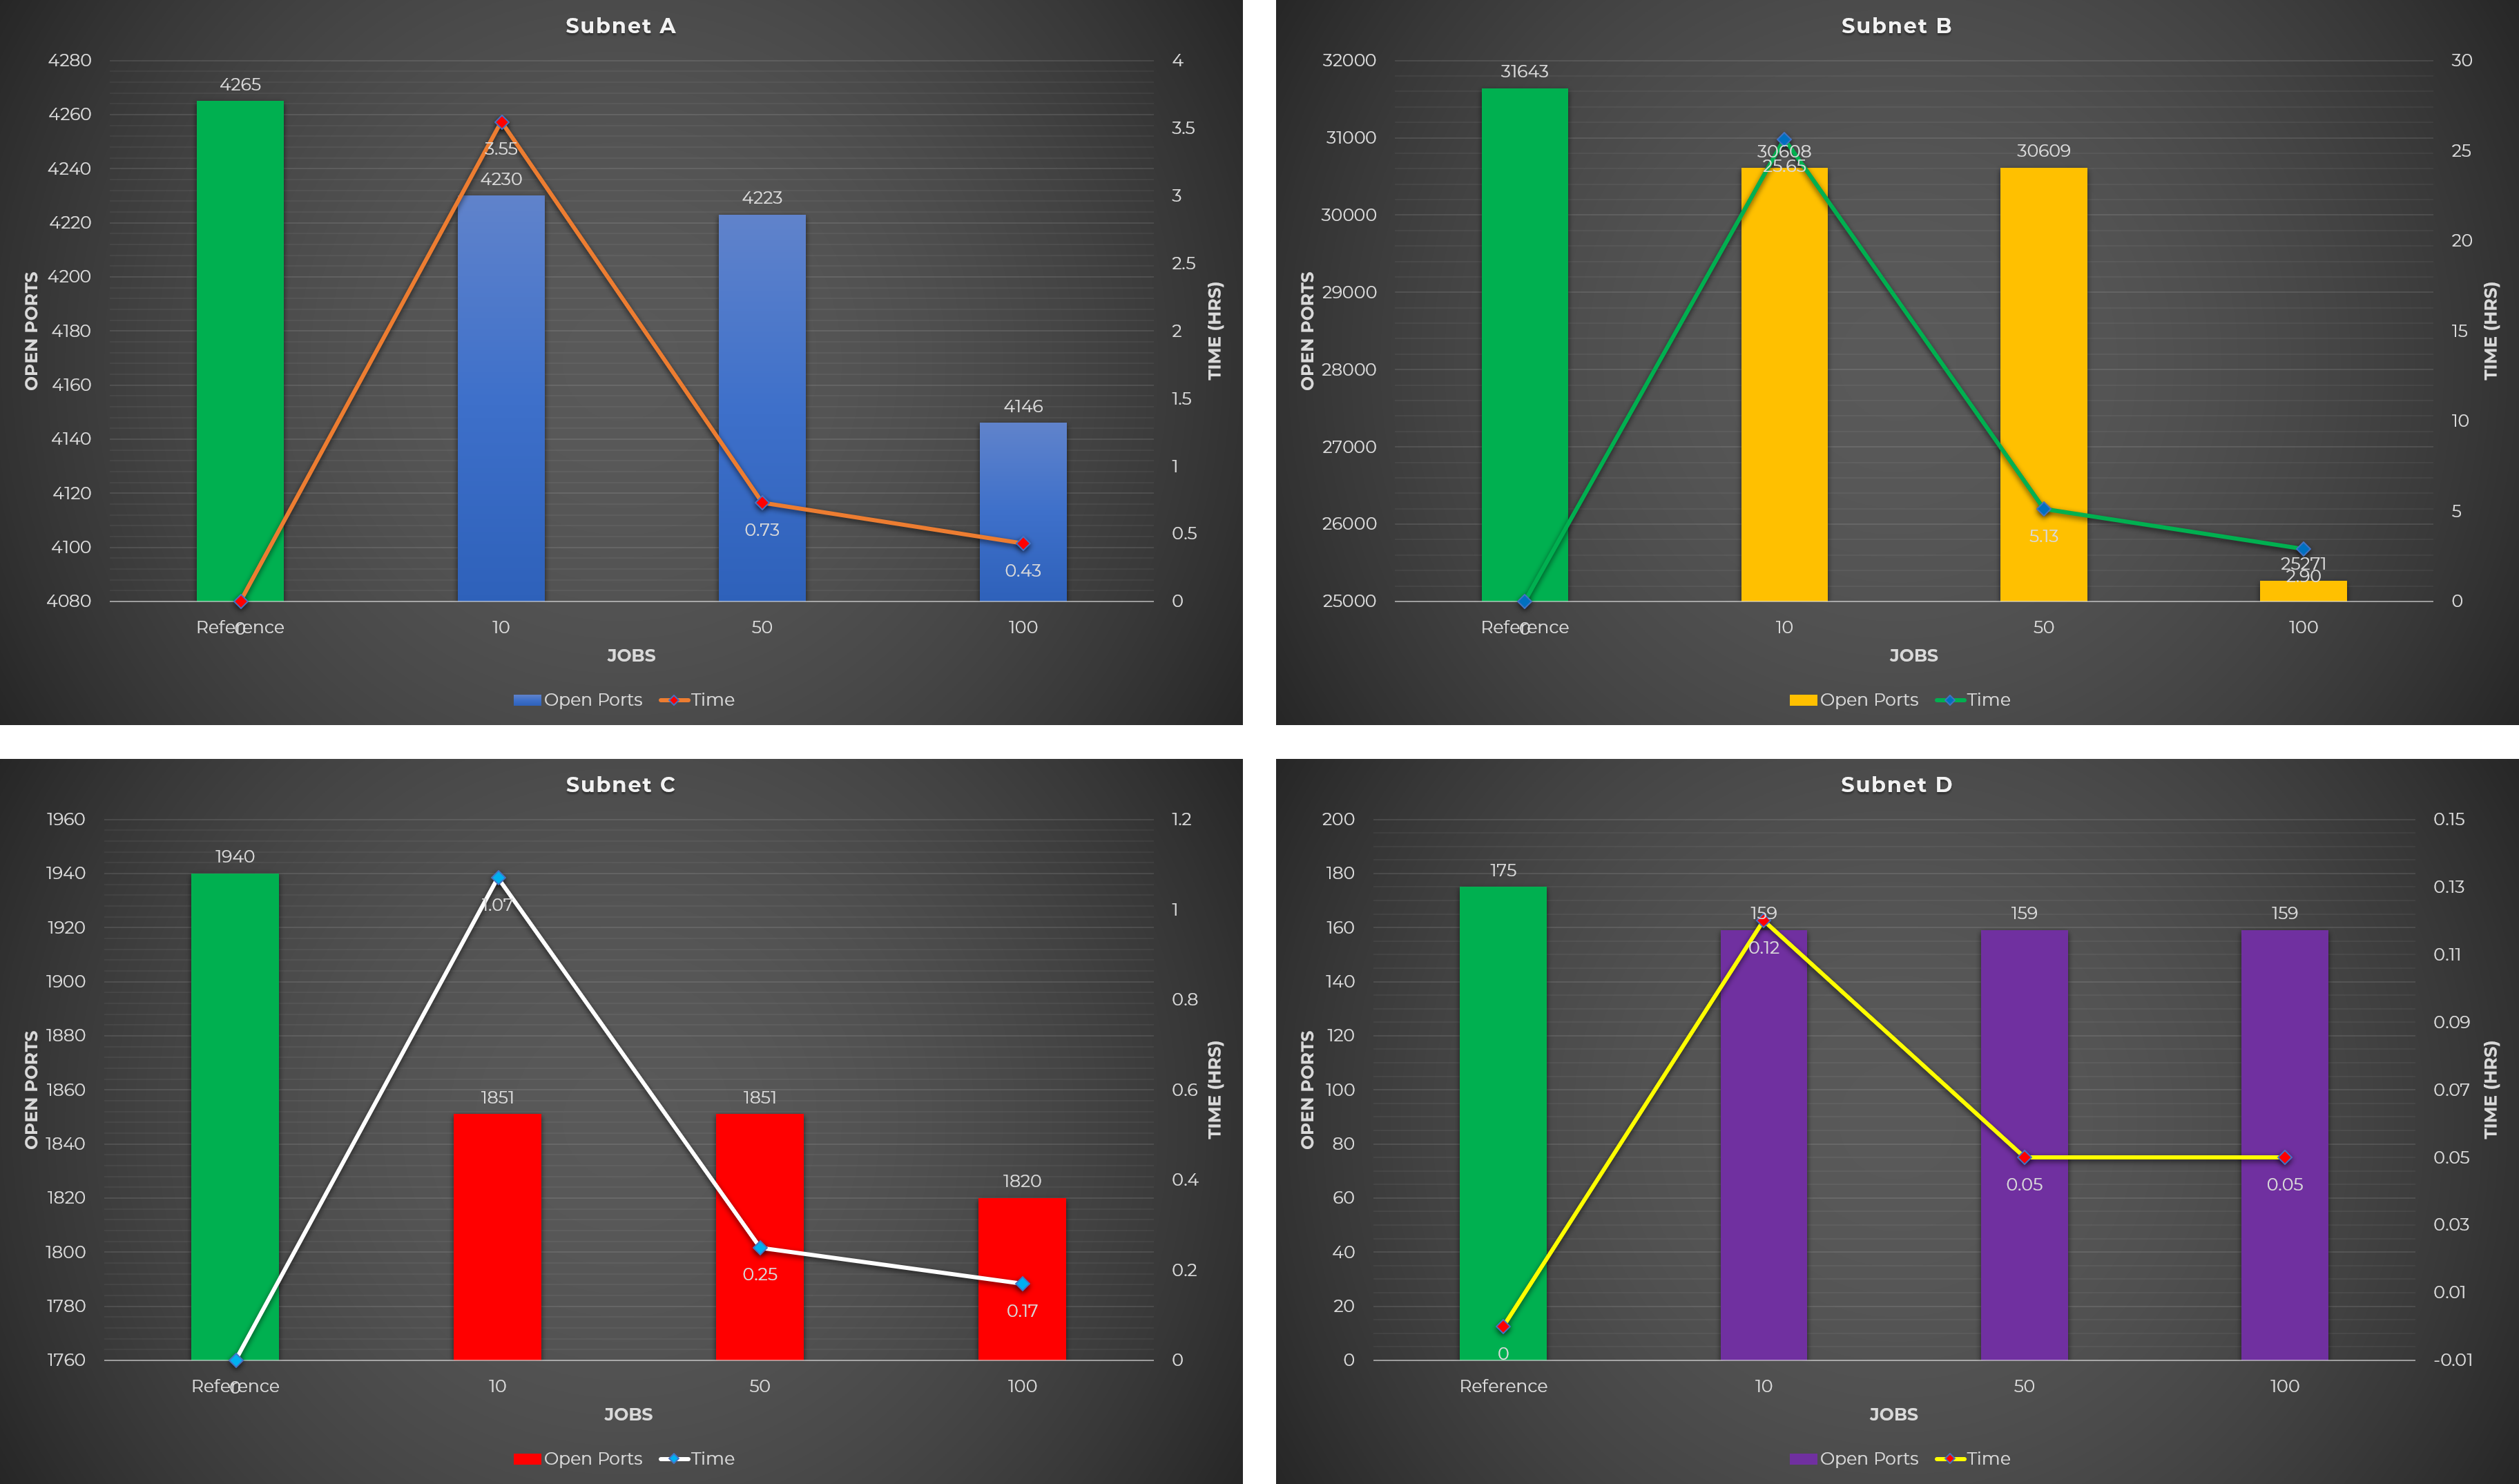
Observations:
- More concurrent jobs and running the machine at 100% CPU utilization yield fewer open ports.
- There’s not much difference between 10 and 50 parallel Nmap scans so it’s recommended to run 50 parallel jobs to reduce the scanning time.
- This test case is slightly faster than Test Case #3 but less open ports were detected.
Raw Data
The following table shows the raw data from the experiments performed using the different Nmap test cases mentioned above. 
Nmap Conclusion
Based on the results with the experiments performed with Nmap, the following were concluded:
- Running an Nmap scan using the combined open ports identified by Masscan (Test Case #3) yields the best results. It’s also the recommended method due to the potential of discovering additional open ports.
- Running the machine at 100% CPU utilization results into fewer open ports.
- When using parallel tasks, fewer jobs results into more open ports.
Research Conclusion
Recommended Approach
Based on the results from the test cases conducted for both Masscan and Nmap, the following are recommended to obtain a balanced approach between speed and accuracy during an Internet-wide port scanning:
- First run a 2 or 3 concurrent Masscan jobs with all 65535 ports split into 4-5 ranges.
- Get a list of hosts and and a combined list of open ports from Masscan’s output.
- Use these list as input to Nmap and do a regular Nmap scan.
Precautions
For both tools, the following precautions should be taken as they will result into fewer open ports being detected:
- Avoid overloading the CPU when scanning.
- Do not use scanning machine’s maximum rate capacity.
- Refrain from running too many parallel tasks.
Final Thoughts
While this research provided an approach on how to balance the speed and accuracy during an Internet-wide port scanning, readers should not take the conclusions here as 100% reliable. Several factors were not included during the research due to limited time and budget. Most notably, the use of only one IP address during the entire research period was not a good setup. Since I was scanning the same target networks for several times, it is possible that the scanning machine’s IP address got blacklisted somehow which can cause inconsistencies with the number of open ports being detected.
Please revisit the Scope and Limitations section as it provides a good insight on some of the factors that might affect the result of this research.
Closing
That’s it for this post! Thanks for reading this lengthy post and happy hacking!